【Kotlin/Android Studio】DataBindingの方法!findViewByIdを排除する

【Kotlin/Android Studio】DataBindingの方法!findViewByIdを排除する

この記事からわかること

  • Android StudioDataBinding(データバインディング)を利用する方法
  • findViewById使用せずViewを取得する
  • データクラスバインディングするには?
  • ActivityFragmentでの実装手順
  • メモリリークを起こさないように扱う方法

index

[open]

\ アプリをリリースしました /

みんなの誕生日

友達や家族の誕生日をメモ!通知も届く-みんなの誕生日-

posted withアプリーチ

参考文献:公式リファレンス:3. タスク: データ バインディングを使用して findViewById() を排除する
参考文献:公式リファレンス:DataBindingライブラリ

環境

今回のプロジェクトの全体はGitHubに上げていますので参考にしてください。

DataBinding(データバインディング)とは?

DataBindingXMLレイアウトファイルとKotlin側のコードを紐づけることができる機能でAndroid Jetpackの一部として組み込まれています。Viewの参照を取得できるViewBindingの機能に合わせて、Viewとデータモデルをバインディング(結びつける)する機能を提供しています。

そのためfindViewByIdメソッドの使用が不要になり、さらにレイアウトファイルとデータモデルが紐づくことでUIの更新とデータの変更が自動的に同期し、UIコードの保守性が向上します。

DataBinding(ViewBinding)を有効にするとXMLレイアウトファイルに紐づいたバインディングクラスが自動生成されます。生成されるバインディングクラス名はactivity_main.xml(MainActivity.kt)ならActivityMainBindingのようになります。
fragment_input.xml(InputFragment)ならFragmentInputBinding

ViewBindingとの違い

ViewBindingとの違いというより両者の違いをまとめると以下の通りです。

DataBindingは「ViewBinding + レイアウトとデータモデルの紐付け機能」が組み込まれたフレームワークになります。レイアウトファイルとデータモデルを紐づける必要がない場合はパフォーマンスに悪影響を与える可能性があるのでViewBindingを使用してください。

導入方法

DataBindingを導入するには「build.gradle(Module)」内のandroidの中にbuildFeatures { dataBinding true }を追記して「Sync Now」をクリックします。


android {
  // 〜〜〜〜〜〜

  buildFeatures {
    dataBinding true
  }

  // 〜〜〜〜〜〜
}

この際に以下のようなエラーが発生することがありますが、その場合はcompileSdktargetSdkのバージョンを確認してみてください。

Execution failed for task ':app:checkDebugAarMetadata'.
> A failure occurred while executing com.android.build.gradle.internal.tasks.CheckAarMetadataWorkAction
   > 5 issues were found when checking AAR metadata:
  
    1.  Dependency 'androidx.appcompat:appcompat-resources:1.7.0' requires libraries and applications that
      depend on it to compile against version 34 or later of the
      Android APIs.

      :app is currently compiled against android-33.

      Also, the maximum recommended compile SDK version for Android Gradle
      plugin 8.0.2 is 33.

      Recommended action: Update this project's version of the Android Gradle
      plugin to one that supports 34, then update this project to use
      compileSdk of at least 34.

      Note that updating a library or application's compileSdk (which
      allows newer APIs to be used) can be done separately from updating
      targetSdk (which opts the app in to new runtime behavior) and
      minSdk (which determines which devices the app can be installed
      on).

Activityでの使い方

プロジェクト内で「レイアウトとViewの参照の自動紐付け機能」を利用するための手順は以下の通りです。

  1. レイアウトファイルを変更する
  2. レイアウトリソースを参照する

ViewBindingではレイアウトファイルを特に修正する必要なくバインディングクラスが自動生成されていましたが、DataBindingではレイアウトファイルを少し修正しないとバインディングクラスが自動生成されないので注意してください。

1.レイアウトファイルを変更する

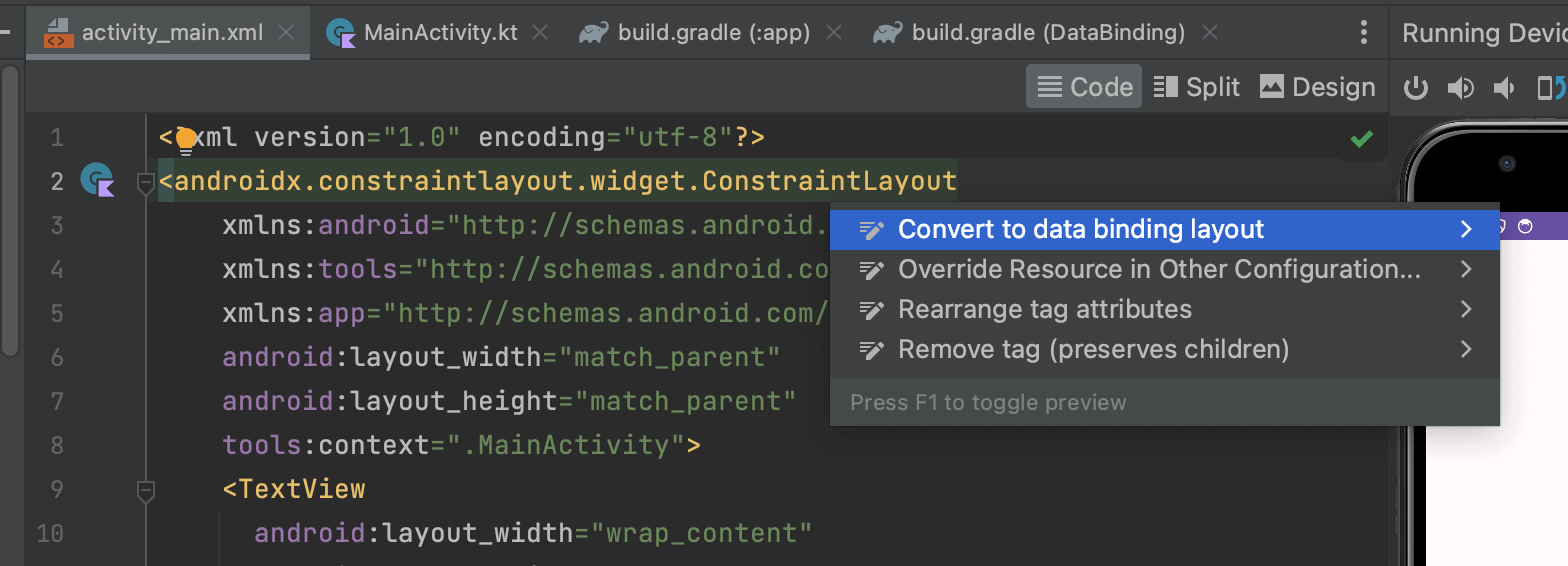
DataBindingを使用したい場合はXMLレイアウトファイルのルートを<layout>タグで囲む必要があります。対象のレイアウトファイルをCodeで開いて現在のルートタグ部分で「Option + Enter」を押し「Convert to data binding layout」をクリックします。すると中身が自動的に変換されます。
【Kotlin/Android Studio】DataBindingの方法!findViewByIdを排除する

↓↓↓↓↓↓↓↓変換後↓↓↓↓↓↓↓↓


<?xml version="1.0" encoding="utf-8"?>
<layout xmlns:android="http://schemas.android.com/apk/res/android"
    xmlns:tools="http://schemas.android.com/tools"
    xmlns:app="http://schemas.android.com/apk/res-auto">

    <data>

    </data>

    <androidx.constraintlayout.widget.ConstraintLayout
        android:layout_width="match_parent"
        android:layout_height="match_parent"
        tools:context=".MainActivity">

        <TextView
            android:id="@+id/main_text"
            android:layout_width="wrap_content"
            android:layout_height="wrap_content"
            android:text="Hello World!"
            app:layout_constraintBottom_toBottomOf="parent"
            app:layout_constraintStart_toStartOf="parent"
            app:layout_constraintEnd_toEndOf="parent"
            app:layout_constraintTop_toTopOf="parent" />


        <Button
            android:id="@+id/done_button"
            android:layout_width="wrap_content"
            android:layout_height="wrap_content"
            android:text="Button"
            app:layout_constraintBottom_toBottomOf="parent"
            app:layout_constraintEnd_toEndOf="parent"
            app:layout_constraintStart_toStartOf="parent"
            app:layout_constraintTop_toBottomOf="@+id/main_text" />

    </androidx.constraintlayout.widget.ConstraintLayout>
</layout>

ルートに<layout>タグが追加され、名前空間が<layout>タグに移動しています。また<data>タグも自動で付与されます。

2.レイアウトリソースを参照する

Activityからレイアウト内のウィジェットを参照してみます。使用するためにはまずMainActivityクラス内にbindingプロパティを追加します。


private lateinit var binding: ActivityMainBinding

次にonCreateメソッド内のsetContentViewメソッドをDataBindingUtilを使用した以下のように置き換えます。


override fun onCreate(savedInstanceState: Bundle?) {
    super.onCreate(savedInstanceState)
    binding = DataBindingUtil.setContentView(this, R.layout.activity_main)
}

これで準備が整いました。bindingプロパティからウィジェットに付与したidのキャメルケースで該当のViewを取得できるようになります。例:done_buttondoneButton


binding.doneButton.setOnClickListener{
  binding.mainText.setText("こんにちは")
}

データモデルの紐付けは後述しています。

Fragmentでの使い方

公式リファレンス:フラグメントでビュー バインディングを使用する

FragmentでDataBindingを使用する場合はonCreateViewメソッド内でinflateメソッドを使用してBindingを取得し、binding.rootを返します。この際にlateinitではなくprivate varで参照用のbindingと更新用の_bindingを用意し、onDestroyViewメソッドで明示的に解放するように実装します。

class FirstFragment : Fragment() {

    private var _binding: FragmentFirstBinding? = null
    private val binding get() = _binding!!

    override fun onCreateView(
        inflater: LayoutInflater, container: ViewGroup?,
        savedInstanceState: Bundle?
    ): View? {
        _binding = FragmentFirstBinding.inflate(inflater, container, false)
        binding.lifecycleOwner = viewLifecycleOwner
        return binding.root
    }

    override fun onViewCreated(view: View, savedInstanceState: Bundle?) {
        super.onViewCreated(view, savedInstanceState)

        binding.doneButton.setOnClickListener {
            parentFragmentManager.popBackStack()
        }
    }

    override fun onDestroyView() {
        super.onDestroyView()
        _binding = null
    }
}

lateinitではメモリリークの危険

lateinitで実装するとメモリリークの原因になるので注意してください。これはbinding.lifecycleOwnerに指定しているライフサイクルとviewLifecycleOwnerが微妙に異なるためです。

class FirstFragment : Fragment() {

    private lateinit var binding: FragmentFirstBinding

    override fun onCreateView(
        inflater: LayoutInflater, container: ViewGroup?,
        savedInstanceState: Bundle?
    ): View? {
        binding = FragmentFirstBinding.inflate(inflater, container, false)
        binding.lifecycleOwner = viewLifecycleOwner
        return binding.root
    }
}

lifecycleOwnerviewLifecycleOwnerを指定している実装と指定していない実装を見かけますが、lifecycleOwnerviewLifecycleOwnerを指定するのはLiveDataを使用している場合にライフサイクルを指定しないとLiveDataが動作しなくなってしまうからです。

そのためLiveDataを使用しないならlifecycleOwnerの指定は不要でメモリリークもしないのかもしれませんが、公式の実装ではFragmentではlateinitを使用していないのでどちらにせよlateinitを使わない方が安全だと思います。

参考記事:1. DataBinding/ViewBindingでメモリリーク

データモデルをBindingする

定義したデータモデルをViewに紐づけることでビューとデータモデル間で双方向のデータバインディングが適応され、データの変更がビューに自動的に反映されるようになります。今回は独自データクラスを作成しバインディングしていきます。


data class User(
  var name: String = "", 
  var nickname: String = ""
)

続いて<data>タグの中に<variable>タグを追加し、name属性とtype属性を以下のように記述します。タイプは各々のプロジェクト名に変換してください。


<data>
    <variable name="user" type="com.example.databinding.User" />
</data>

今回はデータクラスをTextViewのtextにbindingしてみます。android:text@={user.name}のように@={データクラス名.プロパティ}形式でセットします。


<TextView
    android:id="@+id/main_text"
    android:layout_width="wrap_content"
    android:layout_height="wrap_content"
+   android:text="@{user.name}"
    app:layout_constraintBottom_toBottomOf="parent"
    app:layout_constraintStart_toStartOf="parent"
    app:layout_constraintEnd_toEndOf="parent"
    app:layout_constraintTop_toTopOf="parent" />

これでTextViewのtextがUserクラスと紐づいているので「MainActivity」内から以下のようにbinding.クラス名で参照し、そこにデータを格納するだけでTextViewにも反映されるようになります。


binding.user = User("ame")

動的に変化させる

EditTextから変更された値をボタンクリック時にTextViewに反映させてみたいと思います。EditTexttextViewを追加しておきます。


<EditText
  android:id="@+id/edit_nickname"
  android:layout_width="wrap_content"
  android:layout_height="wrap_content"
  android:ems="10"
  android:inputType="text"
  android:text="nickname"
  app:layout_constraintBottom_toTopOf="@+id/main_text"
  app:layout_constraintEnd_toEndOf="parent"
  app:layout_constraintStart_toStartOf="parent"
  app:layout_constraintTop_toTopOf="parent" />

  <TextView
      android:id="@+id/textView"
      android:layout_width="wrap_content"
      android:layout_height="wrap_content"
      android:text="@={user.nickname}"
      app:layout_constraintBottom_toTopOf="@+id/main_text"
      app:layout_constraintEnd_toEndOf="parent"
      app:layout_constraintStart_toStartOf="parent"
      app:layout_constraintTop_toBottomOf="@+id/edit_nickname" />

コードは以下の通りになります。applyを使って重複するbindingを省略しています。動的に更新されたデータを反映させるにはinvalidateAllメソッドを最後に実行します。

おすすめ記事:【Kotlin】スコープ関数の使い方!apply/also/let/run/withの違い


binding.apply {
    doneButton.setOnClickListener{
        user?.nickname = editNickname.text.toString()
        invalidateAll()
    }
}
【Kotlin/Android Studio】DataBindingの方法!findViewByIdを排除する

プレビュー用のデフォルト値を設ける

データに依存するように設定するとプレビューでは確認することができません。プレビューで確認できるようにしたい場合はdefaultに値を渡すことで表示させることができます。

android:text="@{user.nickname, default=ニックネーム}"

リストやマップをバインディングする

レイアウトファイルにListMapなどをバインディングするにはimportで使用するデータ型を読み込み、typeでデータ型を指定します。この際にXML構文が破綻しないように&lt;を使用して<をエスケープさせる必要があります。


<data>
    <import type="java.util.Map"/>
    <import type="java.util.List"/>
    <variable name="list" type="List&lt;String>"/>
    <variable name="map" type="Map&lt;String, String>"/>
</data>

データを使用する際は[要素番号][`キー値`]形式で指定します。


android:text="@{list[0]}"
android:text="@{map[`name`]}"

コード側からはそれぞれの変数にデータを渡します。

binding.list = listOf("1", "2")
binding.map = mapOf("name" to "ame", "age" to "29")

リストの範囲外の対応

リスト形式で渡したデータに範囲外の要素番号を指定してしまった場合は空文字になってしまうので、代替文字を指定するには以下のように実装する ことで指定することが可能です。


android:text="@{list[3] != null ? list[3] : `none`}"
-- または--
android:text="@{list[3] ?? `none`}"

使用できる演算子やキーワード

公式リファレンス:式言語

XMLレイアウトファイルでは以下の演算子やキーワードを使用することが可能です。

android:text="@{String.valueOf(index + 1)}"
android:visibility="@{age > 13 ? View.GONE : View.VISIBLE}"
android:transitionName='@{"image_" + id}'

まだまだ勉強中ですので間違っている点や至らぬ点がありましたら教えていただけると助かります。

ご覧いただきありがとうございました。

searchbox

スポンサー

ProFile

ame

趣味:読書,プログラミング学習,サイト制作,ブログ

IT嫌いを克服するためにITパスを取得しようと勉強してからサイト制作が趣味に変わりました笑
今はCMSを使わずこのサイトを完全自作でサイト運営中〜

New Article

index