【Kotlin/Android Studio】SharedPreferencesの実装方法!データをローカルに保存

この記事からわかること
- Android Studio/KotlinのSharedPreferencesとは?
- ローカルにデータを永続的に保存する方法
- アプリを停止してもデータを保持するには?
- 保存できるデータ型の種類
- applyとcommitの違い
index
[open]
\ アプリをリリースしました /
参考文献:公式リファレンス:SharedPreferences
環境
- Android Studio:Koala
- Kotlin:1.9.0
SharedPreferencesとは?
AndroidのSharedPreferencesはKey-Value形式でローカルにデータを保存することができる機能です。利用するために導入作業をする必要はなく、操作するための手順もシンプルで使いやすく実装されています。実際に保存されるのはアプリ内にXML形式のファイルで記述されていきます。
SharedPreferencesを使用することでアプリを停止させても永続的にデータを保存し再度起動した時にもデータを再度取得することが可能になります。ちなみにSharedPreferencesを日本語に訳すと「共有設定」という意味になります。
またローカルにデータを永続的に保存する別の方法としてRoomDataBaseやDataStoreがあります。SharedPreferencesは現在公式より非推奨になっておりDataStoreの使用に切り替えることが推奨されているようです。
SharedPreferencesの使い方
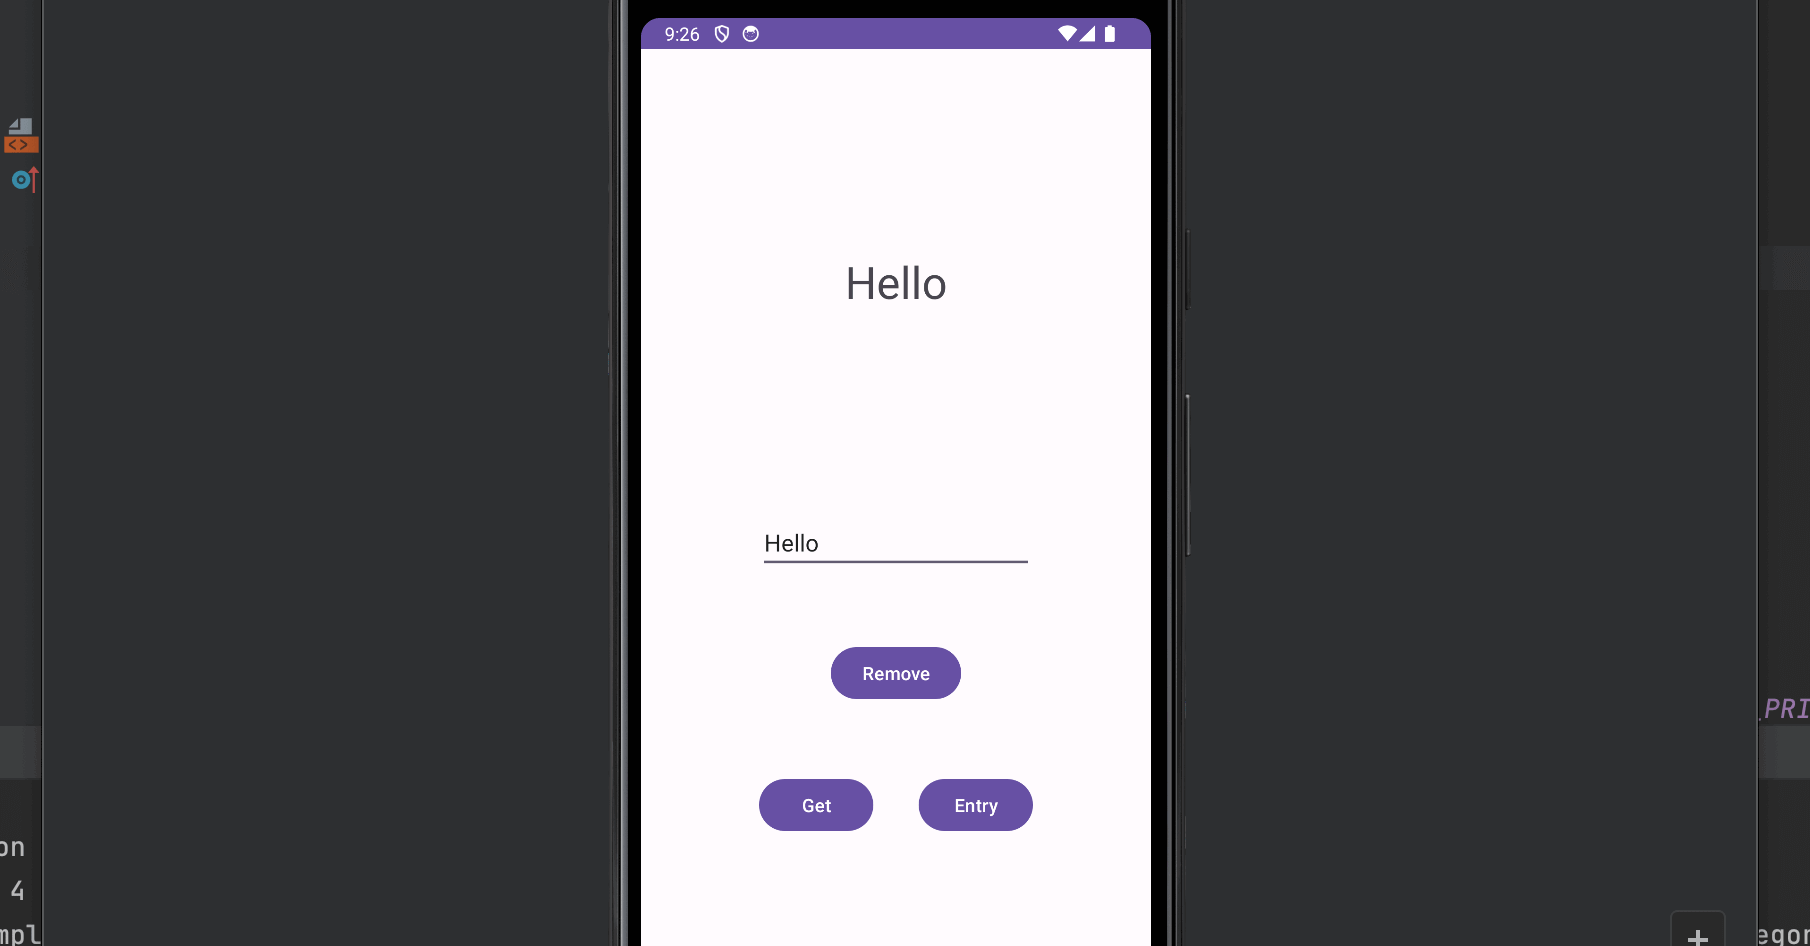
SharedPreferencesを利用する使い方を実際にアプリを作りながらみていきます。最初に「main_activity.xml」にUI部分を構築しておいてください。
<EditText
android:id="@+id/editTextText"
android:layout_width="wrap_content"
android:layout_height="wrap_content"
android:ems="10"
android:inputType="text"
android:text="Name"
app:layout_constraintBottom_toBottomOf="parent"
app:layout_constraintEnd_toEndOf="parent"
app:layout_constraintStart_toStartOf="parent"
app:layout_constraintTop_toTopOf="parent" />
<Button
android:id="@+id/get_button"
android:layout_width="wrap_content"
android:layout_height="wrap_content"
android:text="Get"
app:layout_constraintBottom_toBottomOf="parent"
app:layout_constraintStart_toStartOf="@+id/editTextText"
app:layout_constraintTop_toBottomOf="@+id/editTextText"
app:layout_constraintVertical_bias="0.501" />
<Button
android:id="@+id/entry_button"
android:layout_width="wrap_content"
android:layout_height="wrap_content"
android:text="Entry"
app:layout_constraintBottom_toBottomOf="parent"
app:layout_constraintEnd_toEndOf="@+id/editTextText"
app:layout_constraintTop_toBottomOf="@+id/editTextText"
app:layout_constraintVertical_bias="0.501" />
<TextView
android:id="@+id/item_text"
android:layout_width="wrap_content"
android:layout_height="wrap_content"
android:text="NoItem"
android:textSize="34sp"
app:layout_constraintBottom_toTopOf="@+id/editTextText"
app:layout_constraintEnd_toEndOf="parent"
app:layout_constraintStart_toStartOf="parent"
app:layout_constraintTop_toTopOf="parent" />
<Button
android:id="@+id/remove_button"
android:layout_width="wrap_content"
android:layout_height="wrap_content"
android:text="Remove"
app:layout_constraintBottom_toTopOf="@+id/entry_button"
app:layout_constraintEnd_toStartOf="@+id/entry_button"
app:layout_constraintStart_toEndOf="@+id/get_button"
app:layout_constraintTop_toBottomOf="@+id/editTextText" />

保管するファイルを生成・取得する
SharedPreferencesを利用するためにはまず保存するファイルを取得(または生成)する必要があります。保存するファイルの取得(または生成)にはgetSharedPreferences
メソッドを使用します。引数には生成するファイル名を文字列で指定します。特に指定はありませんが「com.example.プロジェクト名.任意のファイル名」にしておきます。もし指定したファイルがなければ自動で生成し取得、あればそのまま取得できます。
val sharedPref = activity?.getSharedPreferences("com.example.preferences.preference_file_key", Context.MODE_PRIVATE)
第2引数ではファイルの有効範囲を指定します。MODE_PRIVATE
はこのアプリのみで使用できるようにしています。他の設定値としてMODE_WORLD_READABLE
とMODE_WORLD_WRITEABLE
、FLAG_GRANT_READ_URI_PERMISSION
がありますが最初の2つはサポートを終了しているので他のアプリと共有する必要がある場合は3つ目を使用してください。
getPreferenceメソッド
また書き込むファイルを読み込むメソッドとしてgetPreference
メソッドも用意はされています。これは1つのアクティビティに対して1つの共有ファイルのみ使用したい場合にアクティビティからこのメソッドを使うためのメソッドです。そのためファイルの名前を指定する必要はありません。
データの保存
データを保存するにはput○○○
メソッドを使用します。例えばString
型を保存したい場合はputString
メソッドになります。引数には保存する際の識別子となるキーと実際の値を渡します。またそのためにはsharedPref.edit()
からSharedPreferences.Editor
クラスを取得します。
entryButton.setOnClickListener{
if (!editText.text.isEmpty()) {
val str = editText.text.toString()
val editor = sharedPref.edit()
editor.putString("name", str).apply()
}
}
applyとcommitの違い
実際に書き込み処理を行なっているのはapply
メソッドまたはcommit
メソッドです。両者の違いはapply
メソッドは非同期的の処理が実行されcommit
メソッドは同期的に処理が実行されるかです。しかしcommit
メソッドは同期的に実行されるためメインスレッドではUIレンダリングいに影響を及ぼす可能性から避けるようにしてください。
データの取得
保存したデータを取得するにはget○○
メソッドを使用します。引数にはキー値と存在しなかった場合に格納するデフォルト値を渡します。
getButton.setOnClickListener{
// getString(KEY, デフォルト値)
val name = sharedPref.getString("name", "noItem")
itemText.setText(name)
}
保存できるデータ型の種類
保存できるデータ型は以下のとおりです。
データ型 | 保存メソッド | 呼び出しメソッド |
---|---|---|
String | putString(文字列キー, String) | getString(文字列キー,デフォルト値) |
Int | putInt(文字列キー, Int) | getInt(文字列キー, デフォルト値) |
Float | putFloat(文字列キー, Float) | getFloat(文字列キー, デフォルト値) |
Long | putLong(文字列キー, Long) | getLong(文字列キー, デフォルト値) |
Boolean | putBoolean (文字列キー, Boolean) | getBoolean (文字列キー, デフォルト値) |
Set<String> | putStringSet (文字列キー, Set<String>) | getStringSet (文字列キー, デフォルト値) |
データの削除
データを削除するにはremove
メソッドを使用します。引数には削除したいキーを渡します。
removeButton.setOnClickListener{
val editor = sharedPref.edit()
editor.remove("name").apply()
}
全体のコード
全体のコードを載せておきます。コピペして実行できるか試してみてください。
val itemText:TextView = findViewById(R.id.item_text)
val editText:EditText = findViewById(R.id.editTextText)
val entryButton:Button = findViewById(R.id.entry_button)
val getButton:Button = findViewById(R.id.get_button)
val removeButton:Button = findViewById(R.id.remove_button)
val sharedPref = getSharedPreferences("com.example.sharedpreferences.my_preferences", MODE_PRIVATE)
val editor = sharedPref.edit()
entryButton.setOnClickListener{
if (!editText.text.isEmpty()) {
val str = editText.text.toString()
editor.putString("name", str).apply()
}
}
getButton.setOnClickListener{
val name = sharedPref.getString("name", "") // キー値 . デフォルト値
itemText.setText(name)
}
removeButton.setOnClickListener{
editor.remove("name").apply()
}
また今回のサンプルは簡略化のため同期処理でファイルへの読み書きを行いましたが、実際にはKotlin Coroutinesなどを使用した非同期での書き込み処理を行うことをおすすめします。
保存されているファイルの確認方法
保存されているファイルはdata/data/アプリのパッケージ名/shared_prefs/
の中に格納されています。Android Studioから確認する際は右端の「Device File Explorer」>からパスを進んで探してみてください。

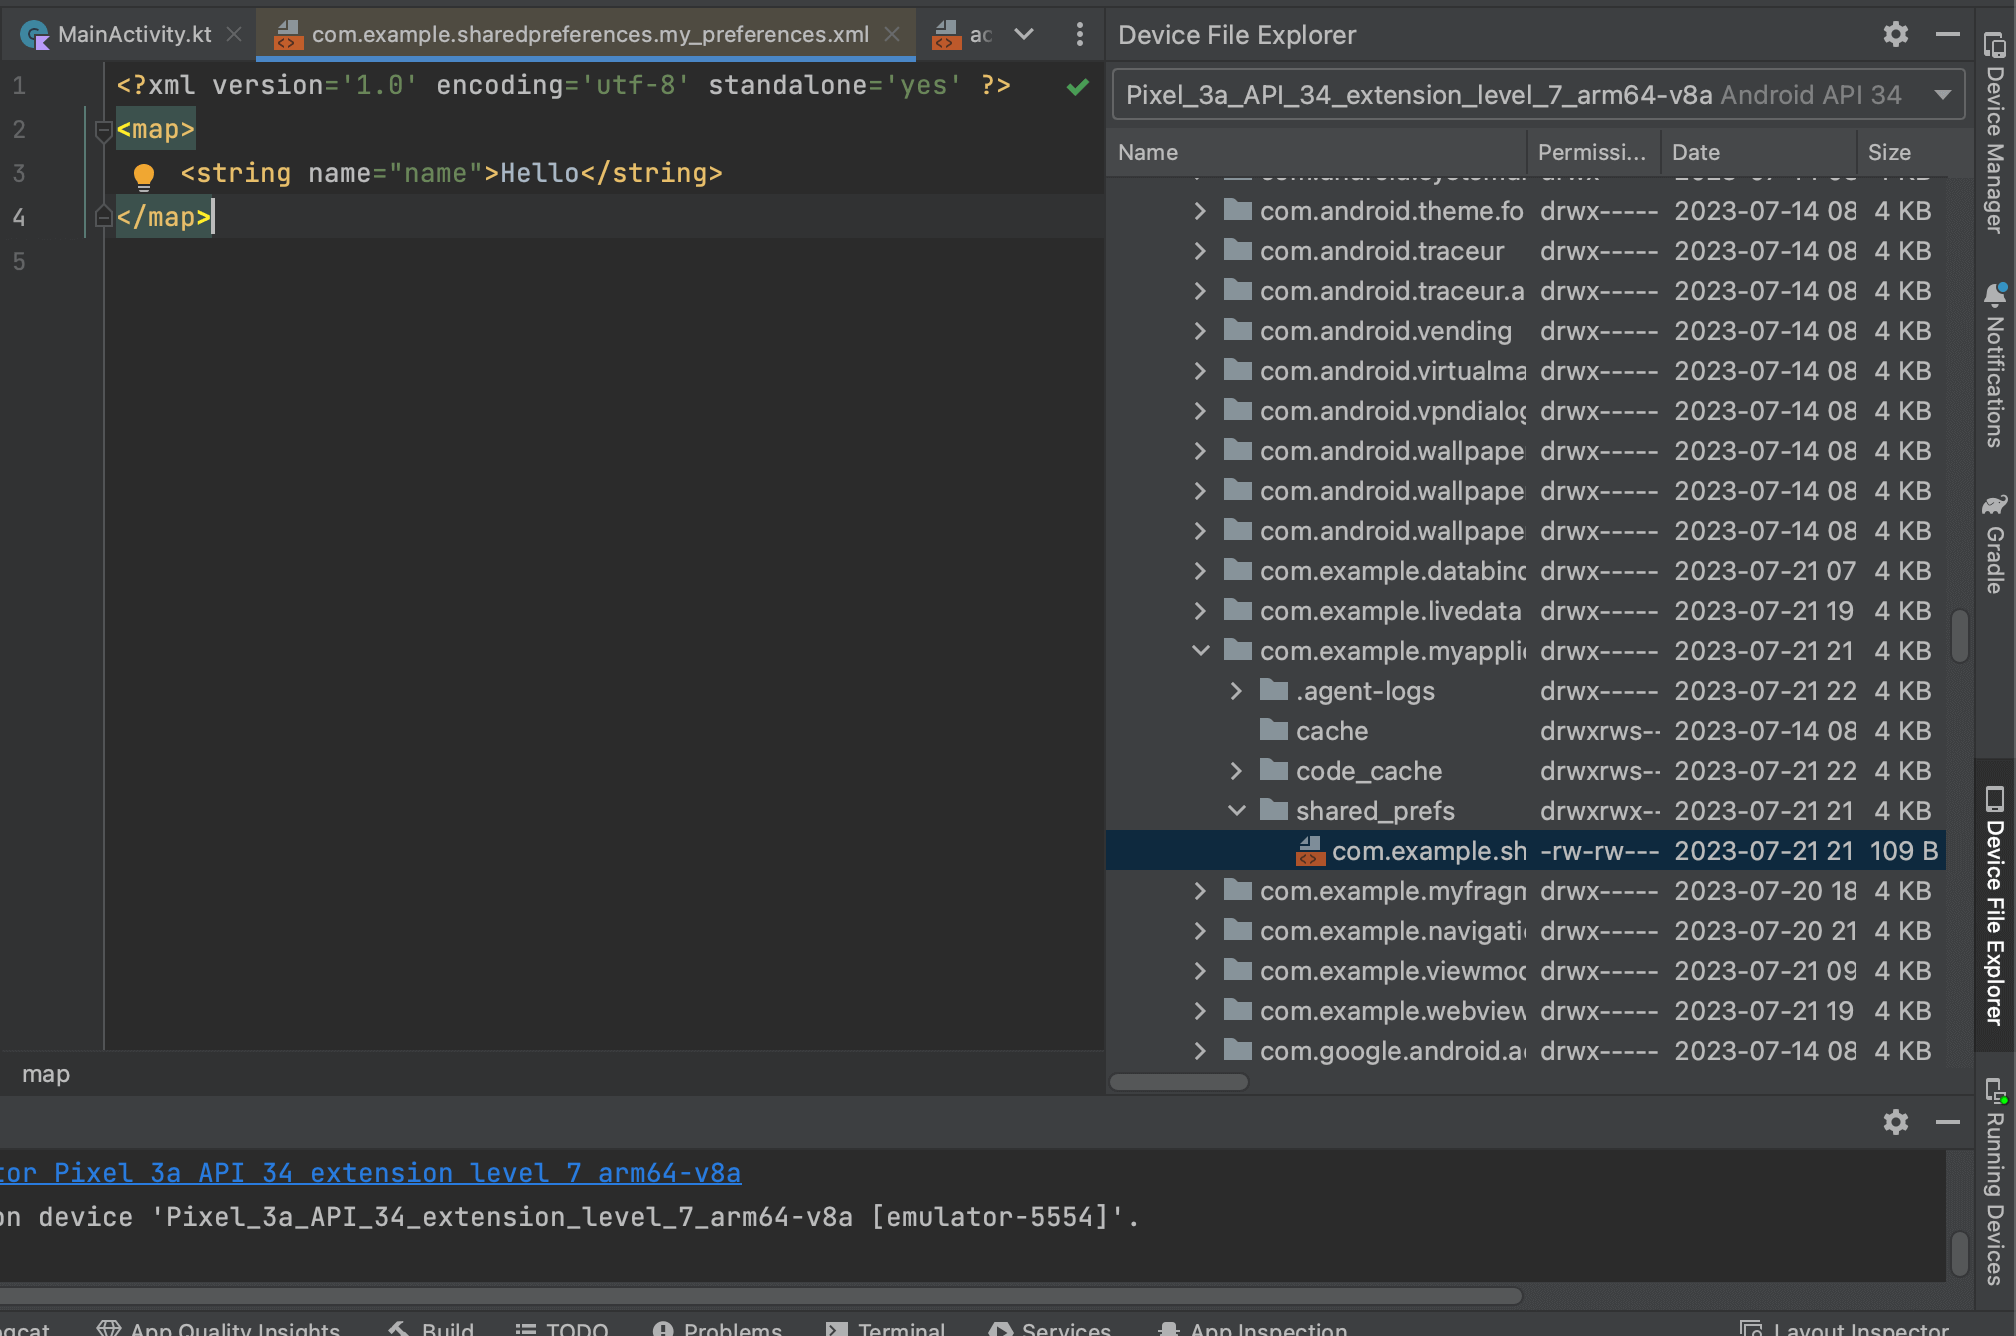
中を開くと以下のようにXML形式でデータが保存されていることが確認できます。
<map>
<string name="name">ame</string>
<int name="age" value="20" />
<float name="pi" value="3.14" />
<long name="num" value="200" />
<boolean name="isClick" value="true" />
<set name="animal">
<string>Lion</string>
<string>Flamingo</string>
</set>
</map>
まだまだ勉強中ですので間違っている点や至らぬ点がありましたら教えていただけると助かります。
ご覧いただきありがとうございました。