【iOSアプリ開発】プロジェクト新規作成時にやるべき初期設定まとめ!
この記事からわかること
- iOSアプリ開発でプロジェクト新規作成時にやるべき初期設定まとめ
index
[open]
\ アプリをリリースしました /
友達や家族の誕生日をメモ!通知も届く-みんなの誕生日-
posted withアプリーチ
iOSアプリ開発でプロジェクト新規作成時にやるべき初期設定
iOSアプリを開発する際に毎回最初に設定している作業がいくつかあって忘れそうだったので備忘録として残しておきます。
- .gitignoreファイルの設定
- Cocoa Podsの導入
- ローカライズ
- AdMobの導入
- Google Analyticsの導入
- アプリ名の編集
1:.gitignoreファイルの設定
アプリのプロジェクトをGitで管理する場合は.gitignoreファイル
を作成し、管理対象外のファイルを明示的に指定します。
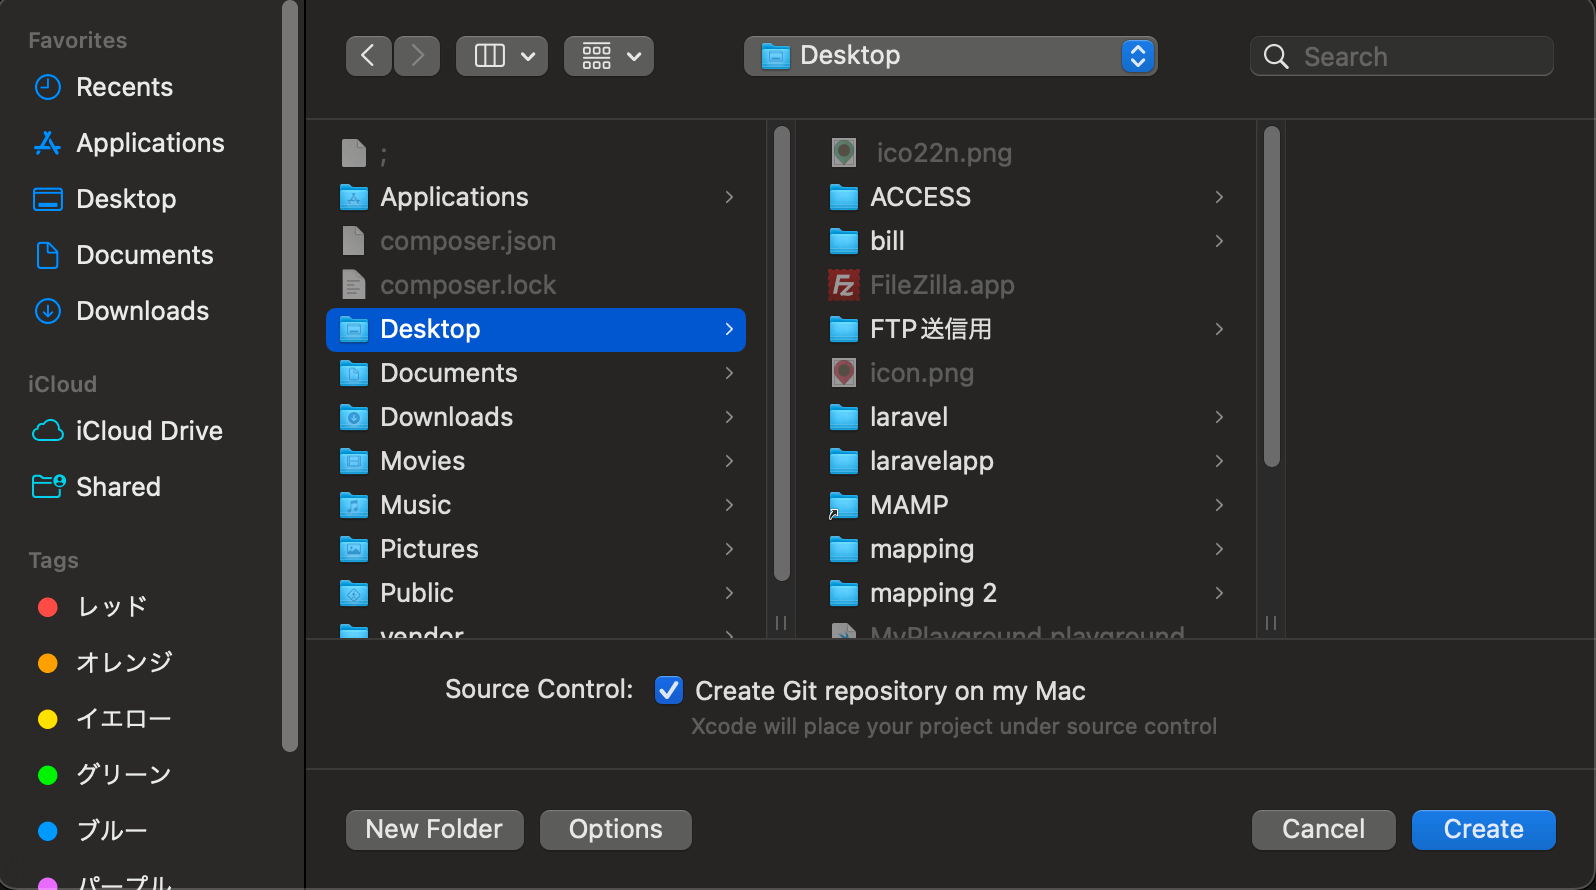
Gitの管理下にするためにはプロジェクト作成時に「Create Git repository on my Mac」をクリックしてローカルリポジトリを作成する必要があります。
続いてターミナルを起動しプロジェクトファイルに移動後touch
コマンドで.gitignoreファイルを作成します。
$ cd プロジェクトのパス
$ touch .gitignore
あとは中に無視したいファイルやパスを記述するだけです。私が使っている中身を置いておきます。適宜書き換えて使用してください。
## Stores meta information about folders and files
.DS_Store
## User settings
xcuserdata/
## compatibility with Xcode 8 and earlier (ignoring not required starting Xcode 9)
*.xcscmblueprint
*.xccheckout
## compatibility with Xcode 3 and earlier (ignoring not required starting Xcode 4)
build/
DerivedData/
*.moved-aside
*.pbxuser
!default.pbxuser
*.mode1v3
!default.mode1v3
*.mode2v3
!default.mode2v3
*.perspectivev3
!default.perspectivev3
## Obj-C/Swift specific
*.hmap
## App packaging
*.ipa
*.dSYM.zip
*.dSYM
## Playgrounds
timeline.xctimeline
playground.xcworkspace
# Swift Package Manager
.build/
# CocoaPods
# Pods/
# *.xcworkspace
# Firebase
GoogleService-Info.plist
# Carthage
Carthage/Build/
# Accio dependency management
Dependencies/
.accio/
# fastlane
fastlane/report.xml
fastlane/Preview.html
fastlane/screenshots/**/*.png
fastlane/test_output
# Code Injection
iOSInjectionProject/
【Xcode/Git】.gitignoreファイルの設定方法!役割や反映されない解決法とは?
2:Cocoa Podsの導入
アプリにライブラリを導入する可能性がある場合はライブラリ管理ツール「Cocoa Pods」を導入しておきます。Cocoa Pods自体がMacの中に未導入の場合は先にインストールしておく必要があります。
【Swift UI】CocoaPodsのインストール方法と使い方!
pod init
で「PodFile」を生成後組み込みたいライブラリを書き込みpod install
を実行すれば指定のライブラリが自動で組み込まれます。
$ cd プロジェクトまでのパス
$ pod init
// 生成されたPodFileを編集
$ pod install
例
# Uncomment the next line to define a global platform for your project
# platform :ios, '9.0'
target '(プロジェクト名)' do
# Comment the next line if you don't want to use dynamic frameworks
use_frameworks!
pod 'Google-Mobile-Ads-SDK'
end
3:ローカライズ(日本語化)
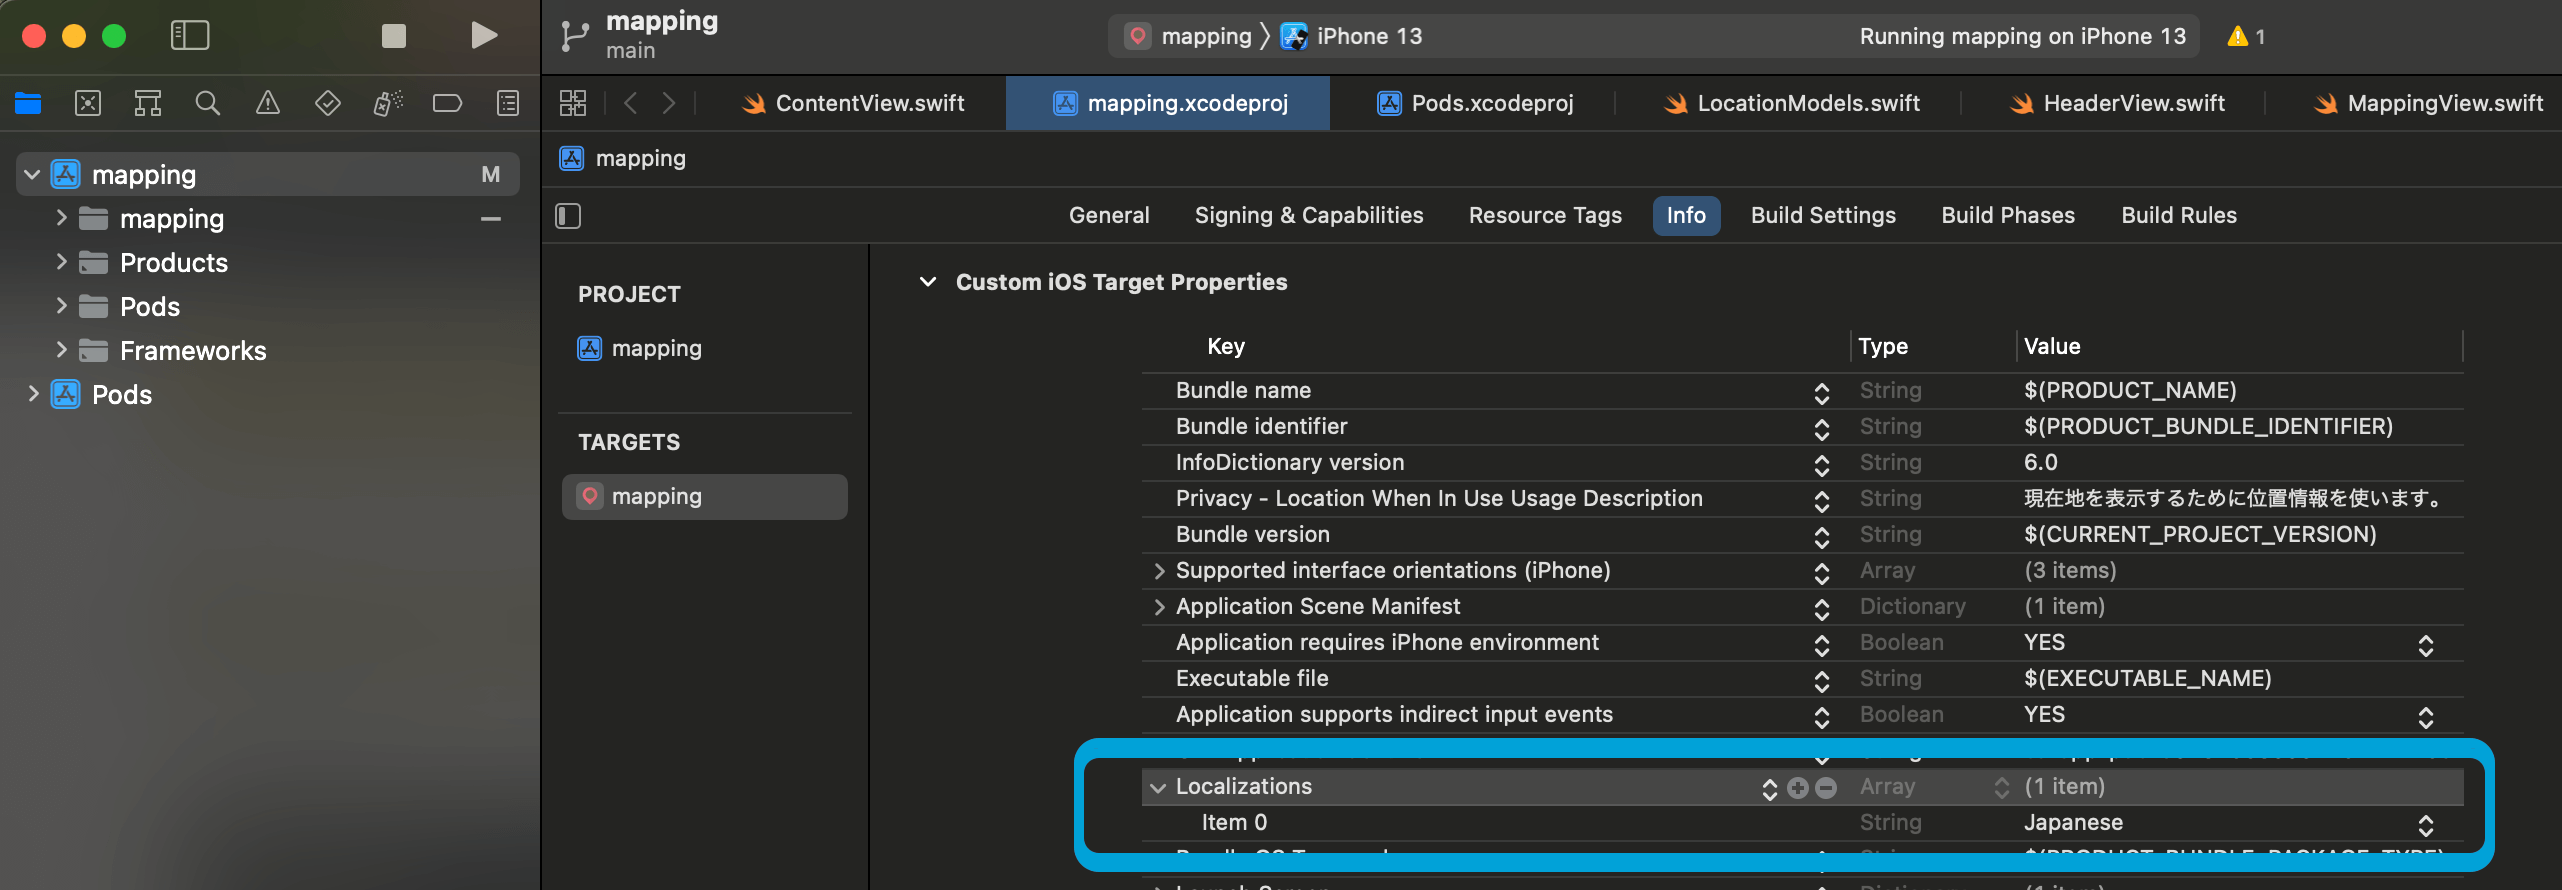
導入したアプリのツールチップやシェア時の文字が日本語になるようにローカライズしておきます。日本語にするには「info.plist
」にLocalizations
を追加して一度確定します。一度確定させると自動でArrayのLocalizationsが作成されるので再度クリックし中の「Key:item 0」のValueを「Japanese」に変更します。
- Key:Localizations
- Type:Array
- Key:「item 0」のValueに「Japanese」
4:AdMobの導入
開発するiOSアプリに広告を付与することが多いと思うのでAdMobの導入も最初に行っておきます。まずやるべき手順を整理します。
- AdMobにアプリを登録(アプリIDの生成)
- 必要な広告IDを生成
- プロジェクトにGoogle-Mobile-Ads-SDKを組み込む
- info.plistに項目を2つ追加
- 初期化コードの記述
- 各広告の実装
ここでは詳細な設定方法は解説しませんので以下の記事を参考にしてください。
【SwiftUI】AdMobを使って広告を実装する方法!バナーViewの作成
AdMobにログインしてアプリの追加と広告IDを発行しておきます。
続いてPod Fileの中に以下の一文を追加しインストールします。
pod 'Google-Mobile-Ads-SDK'
プロジェクトのinfo.plistに以下の2つの項目を追加します。
- Key:GADApplicationIdentifier
- Type:String
- Value:ca-app-pub-3940256099942544~1458002511(これはテスト用)
- Key:SKAdNetworkIdentifier
- Type:String
- Value:cstr6suwn9.skadnetwork
「プロジェクト名App.swift」にAppDelegateクラスを実装し初期化コードを埋め込みます。
import SwiftUI
import GoogleMobileAds
class AppDelegate: UIResponder, UIApplicationDelegate {
func application(_ application: UIApplication,
didFinishLaunchingWithOptions launchOptions: [UIApplication.LaunchOptionsKey: Any]?) -> Bool {
GADMobileAds.sharedInstance().start(completionHandler: nil)
return true
}
}
@main
struct TestApp: App {
@UIApplicationDelegateAdaptor(AppDelegate.self) var appDelegate
var body: some Scene {
WindowGroup {
ContentView()
}
}
}
あとは任意の広告をコードで実装して呼び出すだけです。
【Swift UI】AdMobのリワード広告の実装方法!GADFullScreenContentDelegate
5:Google Analyticsの導入
公開するアプリの分析をするためにGoogle Analyticsを導入します。そのためにはFirebaseへの登録が必要になります。
【Swift UI/Firebase】iOSアプリにGoogle Analyticsを導入する方法!
Firebaseプロジェクトを作成後、iOSアプリを登録し、「GoogleService-Info.plist 」をダウンロードしてSwiftプロジェクトに組み込みます。
PodFileに以下の一文を追加してライブラリをインストールします。
pod 'FirebaseAnalytics'
初期化コードを記載します。
import SwiftUI
import FirebaseCore // 追加
import GoogleMobileAds
class AppDelegate: UIResponder, UIApplicationDelegate {
func application(_ application: UIApplication,
didFinishLaunchingWithOptions launchOptions: [UIApplication.LaunchOptionsKey: Any]?) -> Bool {
FirebaseApp.configure() // 追加
GADMobileAds.sharedInstance().start(completionHandler: nil)
return true
}
}
@main
struct TestApp: App {
@UIApplicationDelegateAdaptor(AppDelegate.self) var appDelegate
var body: some Scene {
WindowGroup {
ContentView()
}
}
}
6:アプリ名の編集
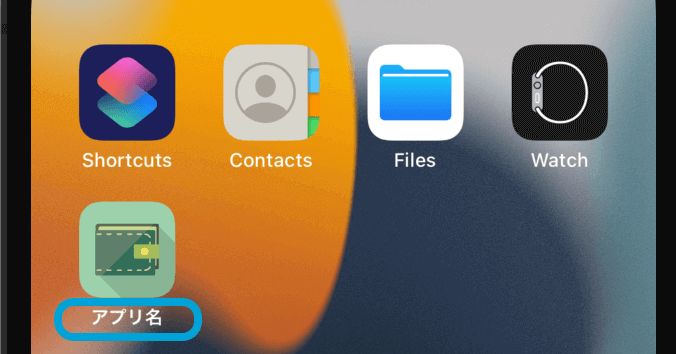
ホーム画面のアプリアイコン下に表示されるアプリ名はデフォルトではプロジェクト名と同じものが表示されます。
これを変更するには「Info.plist」に「Bundle display name」を追加して任意の値を入力すればOKです。
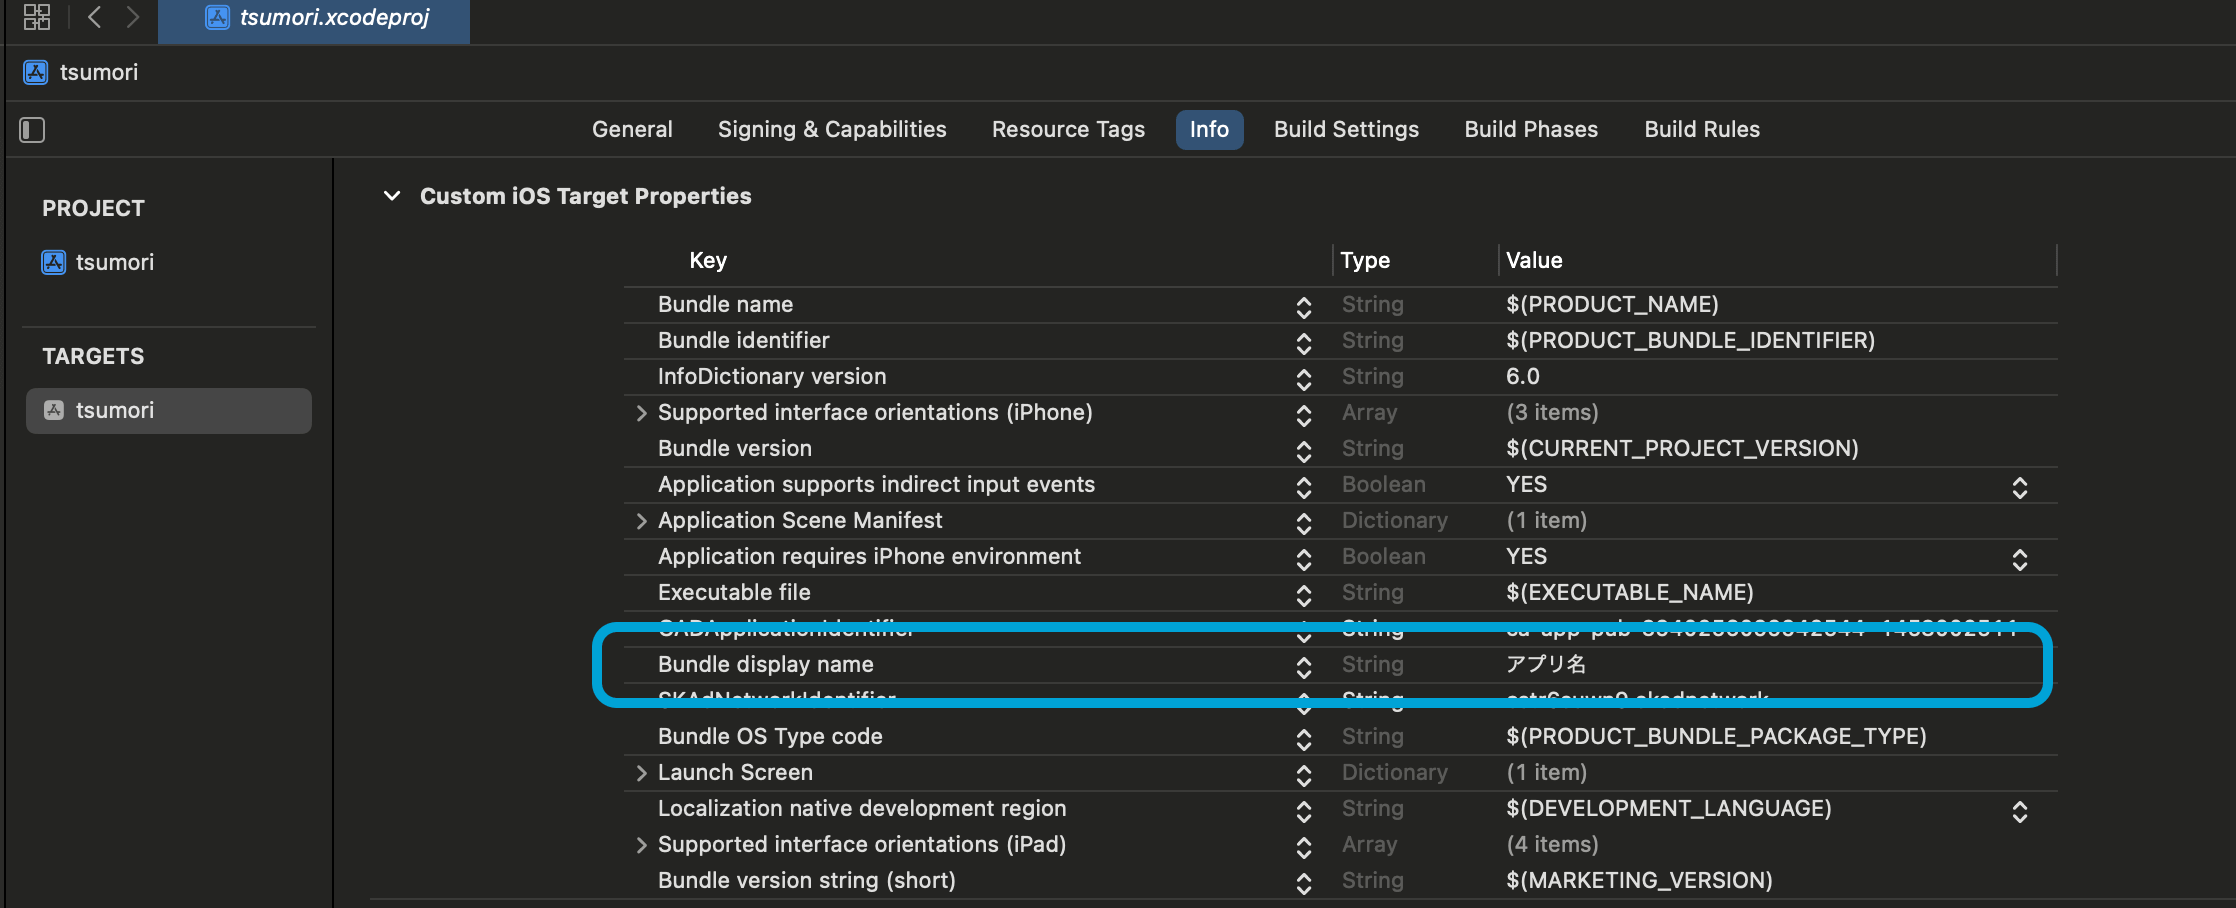
- Key:Bundle display name
- Type:String
- Key:アプリ名
おすすめ記事:【iOS】Xcodeでホーム画面に表示されるアプリ名を変更する方法!
一連の流れ
最後に一連の流れを順番に実行していきます。
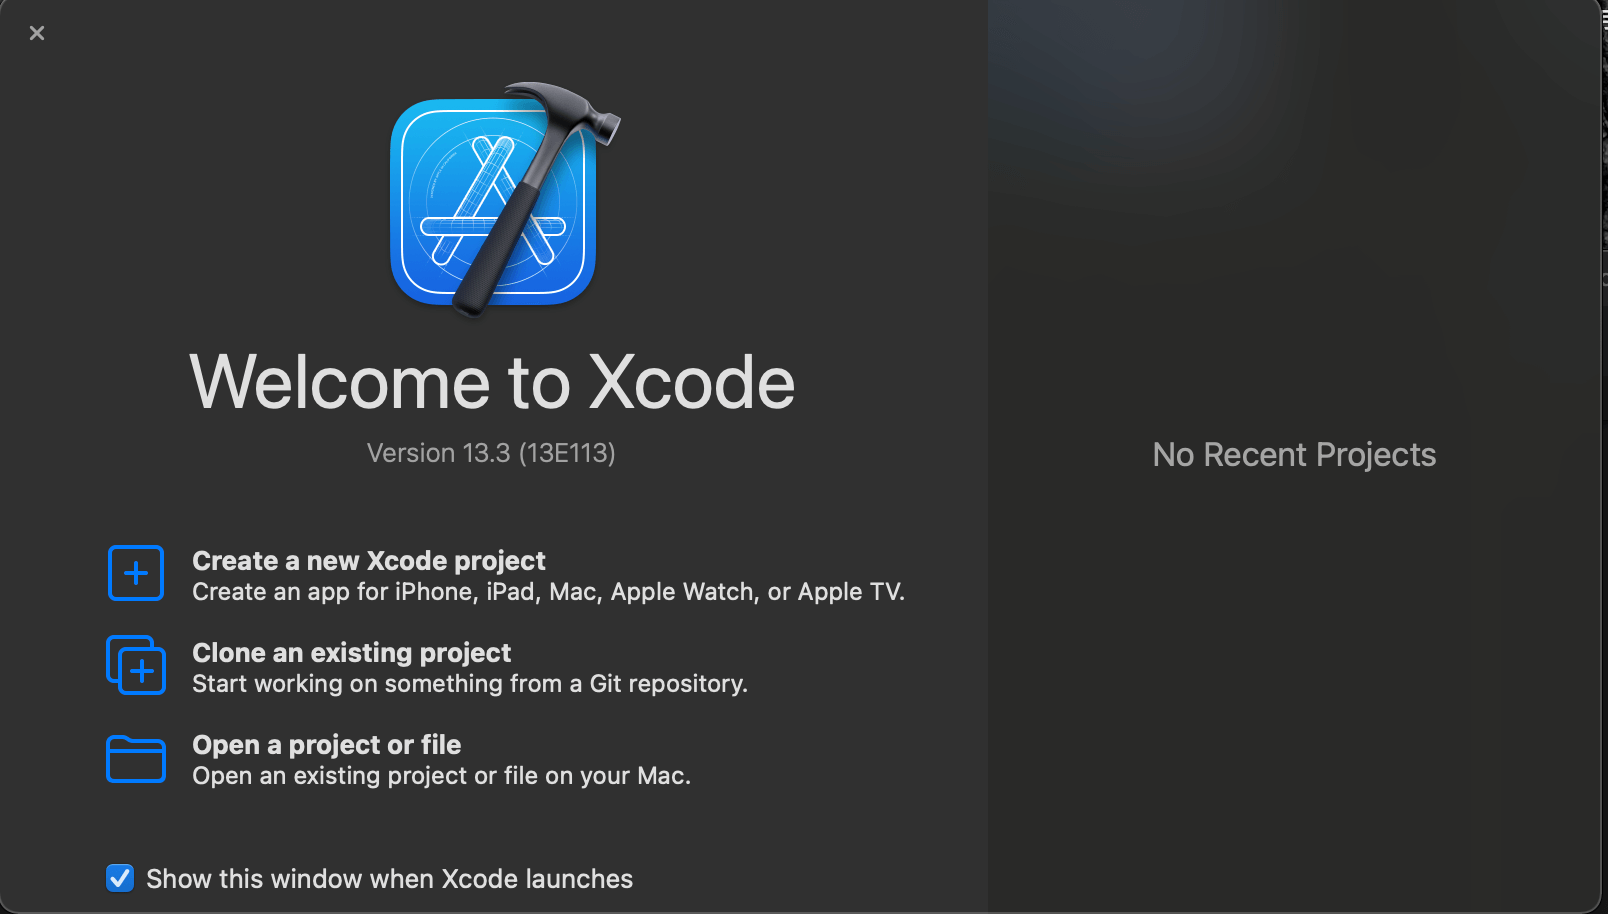
iOSプロジェクトの作成
ローカルリポジトリの作成
.gitignoreファイルの作成
$ cd プロジェクトのパス
$ touch .gitignore
.gitignoreファイルの書き込み
## Stores meta information about folders and files
.DS_Store
## User settings
xcuserdata/
## compatibility with Xcode 8 and earlier (ignoring not required starting Xcode 9)
*.xcscmblueprint
*.xccheckout
## compatibility with Xcode 3 and earlier (ignoring not required starting Xcode 4)
build/
DerivedData/
*.moved-aside
*.pbxuser
!default.pbxuser
*.mode1v3
!default.mode1v3
*.mode2v3
!default.mode2v3
*.perspectivev3
!default.perspectivev3
## Obj-C/Swift specific
*.hmap
## App packaging
*.ipa
*.dSYM.zip
*.dSYM
## Playgrounds
timeline.xctimeline
playground.xcworkspace
# Swift Package Manager
.build/
# CocoaPods
# Pods/
# *.xcworkspace
# Firebase
GoogleService-Info.plist
# Carthage
Carthage/Build/
# Accio dependency management
Dependencies/
.accio/
# fastlane
fastlane/report.xml
fastlane/Preview.html
fastlane/screenshots/**/*.png
fastlane/test_output
# Code Injection
iOSInjectionProject/
Cocoa Podsの導入
$ pod init
必要になるライブラリの導入
pod 'Google-Mobile-Ads-SDK'
pod 'FirebaseAnalytics'
$ pod install
初期化コードの記述
import SwiftUI
import FirebaseCore
import GoogleMobileAds
class AppDelegate: UIResponder, UIApplicationDelegate {
func application(_ application: UIApplication,
didFinishLaunchingWithOptions launchOptions: [UIApplication.LaunchOptionsKey: Any]?) -> Bool {
FirebaseApp.configure()
GADMobileAds.sharedInstance().start(completionHandler: nil)
return true
}
}
@main
struct TestApp: App {
@UIApplicationDelegateAdaptor(AppDelegate.self) var appDelegate
var body: some Scene {
WindowGroup {
ContentView()
}
}
}
Info.plistに追加
- Key:Localizations
- Type:Array
- Key:「item 0」のValueに「Japanese」
- Key:GADApplicationIdentifier
- Type:String
- Value:ca-app-pub-3940256099942544~1458002511(これはテスト用)
- Key:SKAdNetworkIdentifier
- Type:String
- Value:cstr6suwn9.skadnetwork
- Key:Bundle display name
- Type:String
- Key:アプリ名
まだまだ勉強中ですので間違っている点や至らぬ点がありましたら教えていただけると助かります。
ご覧いただきありがとうございました。