【Xcode】アプリ画面の向きを固定する方法!デバイスの回転と縦横識別

【Xcode】アプリ画面の向きを固定する方法!デバイスの回転と縦横識別

この記事からわかること

  • Xcodeアプリ画面向き固定する方法
  • デバイス回転制御する
  • PortraitLandscapeとは?
  • デバイスの向き(//上向き)を取得するには?
  • 画面単位で制御するには?
  • UITabBarControllerUINavigationControllerで期待通りに画面が制御できない原因

index

[open]

\ アプリをリリースしました /

みんなの誕生日

友達や家族の誕生日をメモ!通知も届く-みんなの誕生日-

posted withアプリーチ

環境

iOSアプリではデフォルトの設定で端末を横にした時に画面も横向きになる仕様になっています。そのため横向き画面の対応を行うか画面の回転を制御して横向きにならないようする設定を行う必要があります。今回は「画面の回転を制御する方法」をまとめていきます。

【Xcode】アプリ画面の向きを固定する方法!デバイスの回転と縦横識別

アプリ画面の向きを固定する方法

アプリが許容する画面の向きはXcodeの「TARGETS」>「Deployment Info」>「Device Orientation(デバイスの向き)」から設定可能です。例えば縦向きのみ(横向き対応しない)ようにしたい場合はPortraitのみにチェックを入れます。
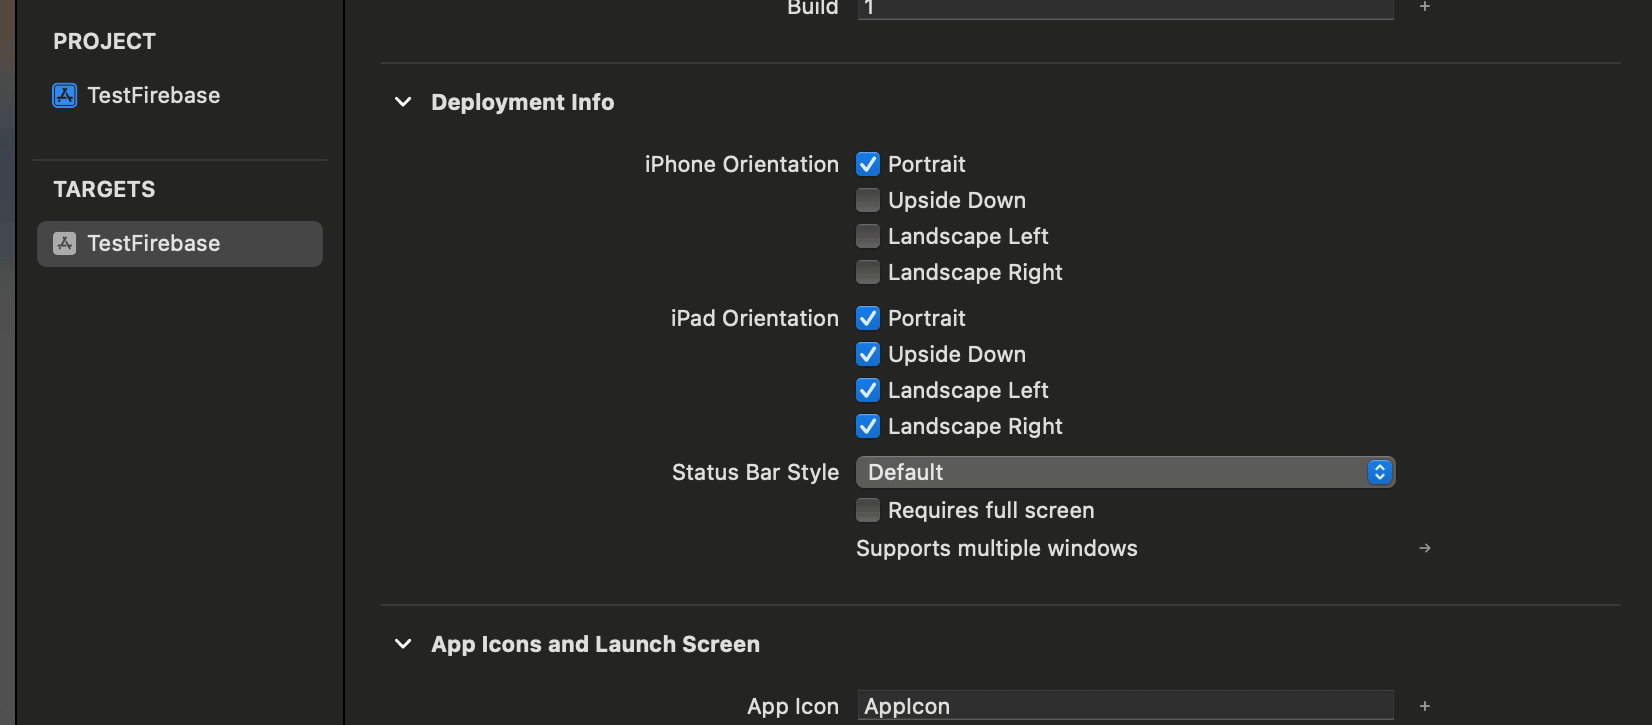
【Xcode】アプリ画面の向きを固定する方法!デバイスの回転と縦横識別

ちなみに英語の意味

Upside Down(逆さま)にならない端末

デフォルトではUpside Down(逆さま)にチェックが入っていない状態ですが、これにチェックを入れても全ての端末で画面が回転時に逆さまになるわけではありません。これは公式に以下のように記載されています。

すべての iPadOS デバイスは、この方向をサポートしています。iPad のイディオムでは、これを有効にすることをお勧めします。iPhone 12 などのホーム ボタンのない iOS デバイスでは、この方向はサポートされていません。iPhone イディオムでは、これを完全に無効にする必要があります。

引用:公式リファレンス:supportedInterfaceOrientations

つまり「iPadとホームボタンのあるiOSデバイスは逆さま対応」、「iPhone12以降のホームボタンのないiOSデバイスは逆さま非対応」のようです。

またそれでも逆さまにならず、逆さまにするためには画面がサポートする方向を制御しているsupportedInterfaceOrientationsで明示的にallportraitUpsideDownを指定してUpside Downを許容させる必要があります。(デフォルト値がiPadの場合はallですがiPhone場合はallButUpsideDownになっているため)

class ViewController: UIViewController {

    /// この画面がサポートする方向
    override var supportedInterfaceOrientations: UIInterfaceOrientationMask {
        return .all
    }
}

iPadでのデバイスの回転

「Device Orientation(デバイスの向き)」は「iPhone Orientation」と「iPad Orientation」に分かれているのでiPadにも画面の向きを適応させたい場合は「iPad Orientation」側のチェックを設定します。

iPadは逆さま対応もしているので期待通りの動作になります。

info.plistから設定する

アプリの画面回転の許容する方向」は「info.plist」からでも設定することが可能です。「info.plist」に設定するためのキー「Supported interface orientations (iPhone)」を指定し、値(value)には先ほどと似たような設定値を渡します。

【Xcode】アプリ画面の向きを固定する方法!デバイスの回転と縦横識別

許容する向きの設定値

先ほどの「Device Orientation」と「Supported interface orientations (iPhone)」はリンクしているようなのでどちらかの設定をいじるともう片方も自動で修正されます。

※ iPad:Supported interface orientations (iPad)キー

現在の画面の向きを取得する

デバイス現在の向きをコードで取得するにはUIDeviceクラスのorientationプロパティを参照します。

UIDevice.current.orientation

取得できるのはUIDeviceOrientation型で値はデバイスが水平で画面が上向きのfaceUpや不明(unknown)などを追加した7種類定義されています。

func printOrientation() {
    
    let orientation:UIDeviceOrientation = UIDevice.current.orientation
    switch orientation{
        case .unknown:
            print("デバイスの向きが不明")
        case .portrait:
            print("デバイスの向きが縦向き")
        case .portraitUpsideDown:
            print("デバイスの向きが逆さま")
        case .landscapeLeft:
            print("デバイスの向きが左向き")
        case .landscapeRight:
            print("デバイスの向きが右向き")
        case .faceUp:
            print("デバイスが水平で画面が上向き")
        case .faceDown:
            print("デバイスが水平で画面が下向き")
        default:
            break
            
    }
}

またデバイスの向きの変化は観測することも可能です。詳細は以下の記事を参考にしてください。

画面単位の回転制御

Xcodeからの回転制御の設定はアプリ全体に影響します。そのため特定の画面だけ横向き対応したい場合などには使用できません。画面単位ごとに回転を制御させるには先に少し登場しましたがsupportedInterfaceOrientationsをオーバーライドして許容する方向をUIInterfaceOrientationMask型で返せばOKです。

class ViewController: UIViewController {
    /// ViewControllerがサポートするインターフェイスの方向
    override var supportedInterfaceOrientations: UIInterfaceOrientationMask {
        return .portrait
    }
}

コードから画面を回転させる

例えば任意のタイミングでコードから画面を回転させたい場合supportedInterfaceOrientations返却値を変数で保持させます。あとは任意のタイミングで切り替えるだけうまくいきそうですがこれだけでは期待通りに動作しません。サポートする画面が変化した際には明示的にsetNeedsUpdateOfSupportedInterfaceOrientationsメソッドを呼び出して通知する必要があります。

class ViewController: UIViewController {
    /// 現在の画面の向き
    private var currentOrientation: UIInterfaceOrientationMask = .portrait
  
    /// ボタンタップで画面の向きをスイッチ
    @IBAction  func buttonTapped() {
        if currentOrientation == .portrait {
            currentOrientation = .landscape
        } else {
            currentOrientation = .portrait
        }
        // サポートする向きが変化したことを通知する
        setNeedsUpdateOfSupportedInterfaceOrientations()
    }
    /// ViewControllerがサポートするインターフェイスの方向
    override var supportedInterfaceOrientations: UIInterfaceOrientationMask {
        return currentOrientation
    }
}

iOS16以前ではshouldAutorotateというものがありこのプロパティでVCの画面の回転自体を制御していましたが今はDeprecatedになっておりsetNeedsUpdateOfSupportedInterfaceOrientationsへの移行が推奨されています。

/// 画面の回転を制御(iOS16以前)
override var shouldAutorotate: Bool {
    return false
}

UITabBarControllerでの画面回転制御

UITabBarControllerUINavigationControllerを使用している場合は上記の方法でも期待通りに動作しません。これはsupportedInterfaceOrientations仕様で表示画面のルートVCの設定が反映されるためです。そのためUITabBarControllerの場合は以下のようにselectedViewControllersupportedInterfaceOrientationsを返すように実装してあげれば切り替えた画面の画面制御が反映されるようになります。

class MyTabController: UITabBarController {

    override func viewDidLoad() {
        super.viewDidLoad()
    }

    override var supportedInterfaceOrientations: UIInterfaceOrientationMask {
        if let vc = selectedViewController {
            return vc.supportedInterfaceOrientations
        } else {
            return .allButUpsideDown
        }
    }
}

extensionでは期待通りに動作しませんでした。


extension UITabBarController {
    open override var supportedInterfaceOrientations: UIInterfaceOrientationMask {
        // 選択されたタブのViewControllerを取得
        if let vc = selectedViewController {
            return vc.supportedInterfaceOrientations
        } else {
            return .allButUpsideDown
        }
    }
}

UINavigationControllerの場合

UINavigationControllerの場合はUINavigationControllerDelegateプロトコルを使用する必要がありました。対象のVCに準拠させたらnavigationControllerSupportedInterfaceOrientationsをオーバーライドして明示的にTopViewControllersupportedInterfaceOrientationsを指定することで期待通りに動作させることができました。

class ViewController: UIViewController {
    
    /// 現在の画面の向き
    private var currentOrientation: UIInterfaceOrientationMask = .portrait

    override func viewDidLoad() {
        super.viewDidLoad()
        // デリゲートセット
        navigationController?.delegate = self
    }
  
    /// ボタンタップで画面の向きをスイッチ
    @IBAction  func buttonTapped() {
        if currentOrientation == .portrait {
            currentOrientation = .landscape
        } else {
            currentOrientation = .portrait
        }
        // サポートする向きが変化したことを通知する
        setNeedsUpdateOfSupportedInterfaceOrientations()
    }
    /// ViewControllerがサポートするインターフェイスの方向
    override var supportedInterfaceOrientations: UIInterfaceOrientationMask {
        return currentOrientation
    }
}

extension ViewController: UINavigationControllerDelegate {
    func navigationControllerSupportedInterfaceOrientations(_ navigationController: UINavigationController) -> UIInterfaceOrientationMask {
        // TopViewControllerのsupportedInterfaceOrientationsを反映させる
        return navigationController.topViewController?.supportedInterfaceOrientations ?? .allButUpsideDown
    }
}

まだまだ勉強中ですので間違っている点や至らぬ点がありましたら教えていただけると助かります。

ご覧いただきありがとうございました。

searchbox

スポンサー

ProFile

ame

趣味:読書,プログラミング学習,サイト制作,ブログ

IT嫌いを克服するためにITパスを取得しようと勉強してからサイト制作が趣味に変わりました笑
今はCMSを使わずこのサイトを完全自作でサイト運営中〜

New Article

index