【SwiftUI】MapKitで地図に経路を表示させる方法!MKMapViewDelegate
この記事からわかること
- Swift UIのMapKitフレームワークの使い方
- 2地点間の経路を表示させる方法
- MKMapViewDelegateのmapView(_:rendererFor:)メソッドの使い方
- MKDirectionsのcalculateメソッドやRequestメソッドとは?
- MKPolylineRenderer/MKPlacemark/MKRoute
- MKOverlay.boundingMapRect
- 経路表示している地図の縮尺を調整する方法
- アノテーションの色と画像の変更方法
index
[open]
\ アプリをリリースしました /
友達や家族の誕生日をメモ!通知も届く-みんなの誕生日-
posted withアプリーチ
SwiftUIでMapKitフレームワークを使用して地図上に経路を表示させる方法をまとめていきたいと思います。
MapKitフレームワークの使い方やポイントが分からない方は下記リンクを参考にしてください。
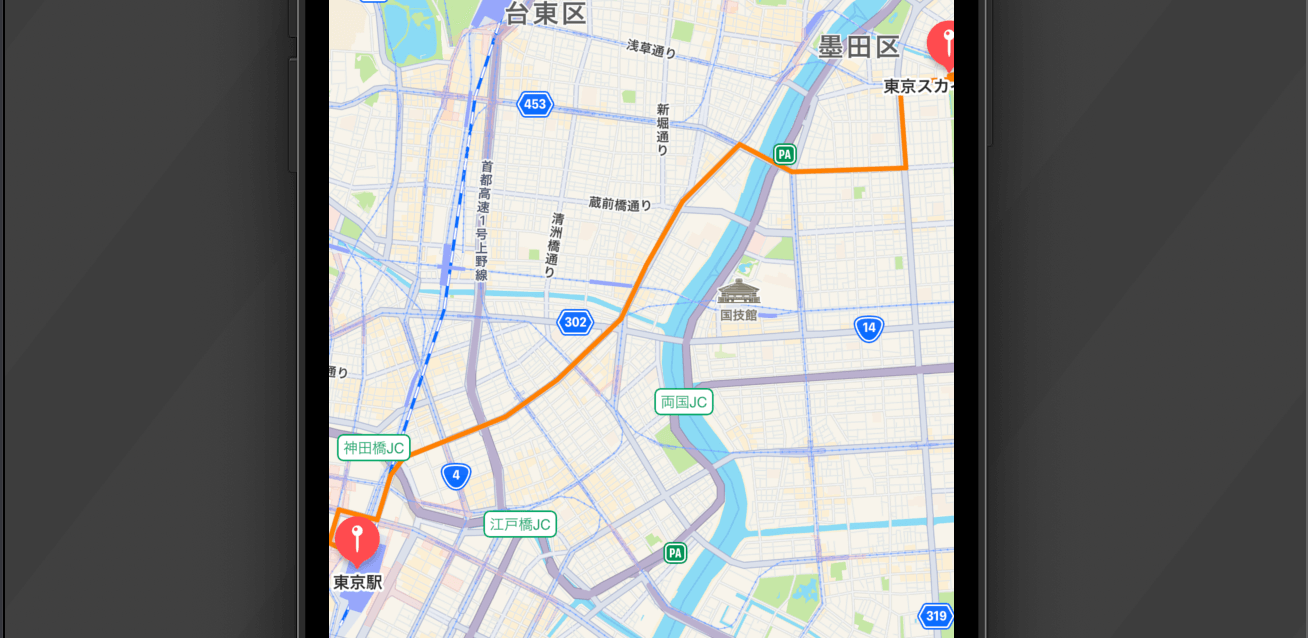
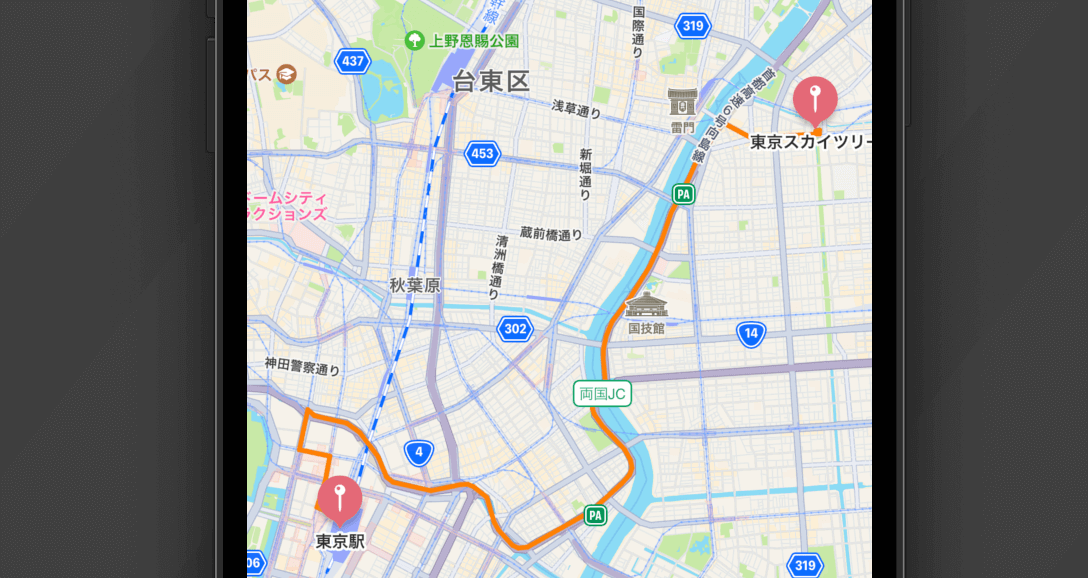
SwiftUIで地図上に経路を表示させる方法
目標
SwiftUIベースのアプリにMapKitで経路表示する
MapKitフレームワークはUIKitベースで使用されており、SwiftUIでも使えるようにとMapView
構造体が追加されたことで使用しやすくなりましたがまだまだ機能的にはUIKitで扱える機能には敵いません。
SwiftUIで地図上に経路を表示させる方法が分からなかったので色々試行錯誤の結果UIKitでビューを構築しSwiftUIで表示できるように変換することで実装できたので方法を解説しておきます。そのためにはUIViewRepresentable
プロトコルの理解が必要なので分からない方は以下の記事を参考にしてください。
流れ
- 2地点間のアノテーション用のクラスを作成
- UIViewRepresentableプロトコルに準拠させたビュー構造体を作成
- デリゲート用のクラスを作成
注意:SwiftUIとUIKitのMapKitの使い方は少し異なります。今回は経路表示を実装するためにUIKitの場合の地図表示方法で進んでいきますが地図を表示するだけであればSwiftUIのMapView構造体で簡単に表示できますのでこちらの記事をご覧ください。
class MKMapView : UIView // UIKit
public struct Map<Content> : View where Content : View // SwiftUI
2地点間のアノテーション用のクラスを作成
まずはアノテーションを表示させるようのクラスを定義します。新しくMapModels.swift
ファイルを作成し中に記述していきます。
アンテーション用のクラスを定義するにはMKAnnotation
プロトコルに準拠させる必要があります。
import MapKit
import SwiftUI
class LocationPin: NSObject, MKAnnotation {
var title: String? // 名称
var latitude: Double // 緯度
var longitude: Double // 経度
// 座標:緯度と経度から自動で構築
var coordinate:CLLocationCoordinate2D {
CLLocationCoordinate2D(latitude: latitude, longitude: longitude)
}
init(title:String, latitude: Double ,longitude: Double) {
self.title = title
self.latitude = latitude
self.longitude = longitude
}
}
イニシャライザで初期値を格納できるようにしておきます。coordinate
プロパティは緯度と経度の各プロパティから自動で構築されるようにしておきます。
UIViewRepresentableプロトコルに準拠させたビュー構造体を作成
続いてUIKitのビューをSwiftUIのビューとして表示させるための構造体を定義していきます。UIViewRepresentable
プロパティに準拠するためにmakeUIView
メソッドとupdateUIView
メソッドの2つを用意します。
struct UIMapView: UIViewRepresentable {
let Manager = MapManager() // 後述するデリゲートクラス
func makeUIView(context: Self.Context) -> MKMapView {
// ビューの初期表示を定義
return MKMapView()
}
func updateUIView(_ uiView: MKMapView, context: Self.Context) {
// ビューが更新された時の表示を定義
uiView.delegate = Manager
}
}
makeUIView
メソッドの戻り値として返す型にはMKMapView
型を指定します。中にはとりあえず表示するMKMapView()
を返しておきます。ここは後ほど書き換えていきます。updateUIView
にはデリゲートプロパティに後述しているデリゲートクラスを格納しておきます。
デリゲート用のクラスを作成
続いてMapViewのデリゲート用のクラスを作成しておきます。MKMapViewDelegate
プロトコルに準拠させてイニシャライザで自身のdelegate
プロパティに自身をセットしておきます。
class MapManager:NSObject, MKMapViewDelegate{
var mapViewObj = MKMapView()
override init() {
super.init() // スーパクラスのイニシャライザを実行
mapViewObj.delegate = self // 自身をデリゲートプロパティに設定
}
func mapView(_ mapView: MKMapView, rendererFor overlay: MKOverlay) -> MKOverlayRenderer {
let renderer = MKPolylineRenderer(overlay: overlay)
renderer.strokeColor = UIColor.orange
renderer.lineWidth = 3.0
return renderer
}
}
デリゲートとは処理を委任する仕組みのことで処理を任せるクラスと任されるクラスを定義しておき使用します。
- プロトコル:MKMapViewDelegate
- 処理を任せるクラス:MapManager
- 処理を任されるクラス:MapManager
- デリゲートメソッド:mapViewメソッド
MKMapViewDelegateプロトコル
protocol MKMapViewDelegate
公式リファレンス:MKMapViewDelegateプロトコル
MKMapViewDelegate
プロトコルはマップに関わる特定の操作や更新を感知して実行されるメソッドを提供するプロトコルです。
地図表示位置の変化やユーザーの位置情報の更新、地図上にオーバーレイを描画したい時など様々な条件で呼び出されるデリゲートメソッドを保持しています。
mapView(_:rendererFor:)メソッド
optional func mapView(
_ mapView: MKMapView,
rendererFor overlay: MKOverlay
) -> MKOverlayRenderer
公式リファレンス:mapView(_:rendererFor:)メソッド
MKMapViewDelegate
プロトコルのmapView(_:rendererFor:)
メソッドは指定されたオーバーレイオブジェクトを地図上に描画するためのRendererオブジェクトをデリゲートに要求するメソッドです。 呼び出されるタイミングはマップの可視部分がオーバーレイオブジェクトとして定義した領域と交差した時です。
噛み下いて解釈すると↓...ということですかね。(間違ってたら教えてください。)
- オーバーレイオブジェクト→実際に被せるコンテンツ
- Rendererオブジェクト→コンテンツを描画するためのプログラム
func mapView(_ mapView: MKMapView, rendererFor overlay: MKOverlay) -> MKOverlayRenderer {
let renderer = MKPolylineRenderer(overlay: overlay)
renderer.strokeColor = UIColor.orange
renderer.lineWidth = 3.0
return renderer
}
引数にはRendererオブジェクトを要求するMKMapView
と表示したいオーバーレイオブジェクトMKOverlay
を渡します。実際に呼び出されるのは内部的に行われるのでこちらが明示的に呼び出すことはありません。
MKPolylineRendererクラス
class MKPolylineRenderer : MKOverlayPathRenderer
経路表示をするための線部分を実装するためにはMKPolylineRenderer
クラスを使います。ポリラインとは線や曲線などを組み合わせているかのようにできた1つのオブジェクトを指していて、線を複数オブジェクト合わせて形を作成するよりデータ容量が抑えられる図形要素の一種です。
let renderer = MKPolylineRenderer(overlay: overlay)
renderer.strokeColor = UIColor.orange
renderer.lineWidth = 3.0
return renderer
スーパークラスとなっている,MKOverlayRenderer
クラスのプロパティにオーバーレイオブジェクトのデザインを変更するためのstrokeColor
やlineWidth
が定義されています。MKOverlayRenderer
がさらにスーパークラスになっているので最終的に返すのはこのインスタンスでOKです。
class MKOverlayPathRenderer : MKOverlayRenderer
公式リファレンス:MKOverlayPathRenderer
経路を構築する処理を作成する
経路を構築するための処理はビューを表示するUIMapView
構造体のmakeUIView
メソッドの中を以下のように書き換えていきます。
func makeUIView(context: Self.Context) -> UIViewType {
let mapView = Manager.mapViewObj // 戻り値で返す用のMapViewを格納
// 1:アノテーション設定
let basePin1 = LocationPin(title: "東京駅",latitude:35.681464, longitude: 139.767052)
let basePin2 = LocationPin(title: "東京スカイツリー", latitude: 35.709152712026265, longitude: 139.80771829999996)
mapView.addAnnotation(basePin1)
mapView.addAnnotation(basePin2)
// 1:アノテーション設定
// 2:経路探索
// 2 - 1
let basePlaceMark1 = MKPlacemark(coordinate: basePin1.coordinate)
let basePlaceMark2 = MKPlacemark(coordinate: basePin2.coordinate)
// 2 - 2
let directionRequest = MKDirections.Request() // リクエストインスタンス
directionRequest.source = MKMapItem(placemark: basePlaceMark1) // 地点1登録
directionRequest.destination = MKMapItem(placemark: basePlaceMark2) // 地点2登録
directionRequest.transportType = MKDirectionsTransportType.automobile // 移動方法登録
// 2 - 3
let directions = MKDirections(request: directionRequest)
directions.calculate { (response, error) in
// オプショナルバインディングで取り出す
guard let directionResonse = response else {
if let error = error {
print("発生したエラー内容:\(error.localizedDescription)")
}
return // nilなら処理を終了
}
// ルートを取得
let route = directionResonse.routes[0]
// ビューにオーバーレイオブジェクトを追加
mapView.addOverlay(route.polyline, level: .aboveRoads)
// 2地点間がちょうど表示される縮尺を取得
let rect = route.polyline.boundingMapRect
mapView.setRegion(MKCoordinateRegion(rect), animated: true)
}
// 2:経路探索
return mapView
}
1:アノテーション設定
この部分は地図上にアノテーションを作成するためのコードです。
let basePin1 = LocationPin(title: "東京駅",latitude:35.681464, longitude: 139.767052)
let basePin2 = LocationPin(title: "東京スカイツリー", latitude: 35.709152712026265, longitude: 139.80771829999996)
mapView.addAnnotation(basePin1)
mapView.addAnnotation(basePin2)
2 - 1:MKPlacemark
class MKPlacemark : CLPlacemark
経路情報のポイントとなる2地点は引数に渡した座標からMKPlacemark
インスタンスを作成しておきます。MKPlacemark
はCLPlacemark
を継承したクラスでその地点の詳細な位置情報(住所や郵便番号、座標など)を保持するクラスになります。
let basePlaceMark1 = MKPlacemark(coordinate: basePin1.coordinate)
let basePlaceMark2 = MKPlacemark(coordinate: basePin2.coordinate)
MKPlacemark
インスタンスにすることで経路検索が可能なMKDirections
クラスに渡すことができるようになります。
2 - 2:MKDirections.Request
公式リファレンス:MKDirections .Request
MKDirections
クラスは経路探索と経路に紐づいた所要時間などを計算をAppleサーバーに要求するクラスです。
まずはRequest()
メソッドでリクエストをインスタンス化しリクエスト情報(出発点と終着点、移動方法)を構築していきます。
let directionRequest = MKDirections.Request() // リクエストインスタンス
directionRequest.source = MKMapItem(placemark: basePlaceMark1) // 地点1登録
directionRequest.destination = MKMapItem(placemark: basePlaceMark2) // 地点2登録
directionRequest.transportType = MKDirectionsTransportType.automobile // 移動方法登録
移動方法はMKDirectionsTransportType
型の中から任意の値に変更できます。
MKDirectionsTransportType(移動方法)の設定値
.automobile // 車
.walking // 歩き
.transit // 公共交通機関
.any // あらゆる交通手段
2 - 3:経路探索リクエストの送信と取得
コードの流れ
- MKDirectionsインスタンスを生成
- calculateメソッドで計算開始
- 引数のcompletionHandlerで結果を取得
- 結果が格納された配列から必要な情報を取得
- オーバーレイオブジェクトをビューに組み込む
- 地図ビューに2地点間がちょうど表示される縮尺を取得してセット
- 最後にMapViewを返して表示
calculateメソッドとcompletionHandler
まずは作成したリクエスト情報を元にMKDirections
インスタンスを生成します。続いてルートを情報の計算を開始させるcalculate
メソッドを実行します。このメソッドは非同期で実行されます。
let directions = MKDirections(request: directionRequest)
directions.calculate { (response, error) in
func calculate(completionHandler: @escaping MKDirections.DirectionsHandler)
引数にはcompletionHandler
が渡されます。これはイベントが発生してから処理を実行するSwiftの仕組みの1つです。今回はリクエストを送信後結果を取得したタイミングで実行されます。
実行される処理はクロージャ(DirectionsHandler
)としてまとめられています。引数にルートの結果を保持するResponse
とエラーを保持するError
型を受け取ります。ルート結果が得られなかった場合はResponse
にnil
が格納されます。
typealias DirectionsHandler = (MKDirections.Response?, Error?) -> Void
ルート情報が格納されるMKRoute
続いて取得した経路結果を表示させるために組み込んでいきます。Response
がnil
の可能性があるのでオプショナルバインディングで取り出します。
directions.calculate { (response, error) in
// オプショナルバインディングで取り出す
guard let directionResonse = response else {
if let error = error {
print("発生したエラー内容:\(error.localizedDescription)")
}
return // nilなら処理を終了
}
// ルートを取得
let route = directionResonse.routes[0]
// ビューにオーバーレイオブジェクトを追加
mapView.addOverlay(route.polyline, level: .aboveRoads)
// 2地点間がちょうど表示される縮尺を取得
let rect = route.polyline.boundingMapRect
mapView.setRegion(MKCoordinateRegion(rect), animated: true)
}
経路結果のルート情報(MKRoute
型)はroutesプロパティ
の中に配列形式で格納されているのでその1番目(インデックス番号[0])から取り出します。MKRoute
のプロパティから経路を示す線(オブジェクト)や所要時間などを取得することができます。
MKRouteのプロパティ
polyline // 経路を示す線(オブジェクト)
name // ルートの名称
distance // 距離(メートル単位)
expectedTravelTime // 所要時間
addOverlayメソッド
// ビューにオーバーレイオブジェクトを追加
mapView.addOverlay(route.polyline, level: .aboveRoads)
MKMapView
のaddOverlay
メソッドでビューに経路を示す線(オーバーレイオブジェクト)を追加していきます。これでビューに追加された経路を示す線が可視領域に入った場合にmapView(_:rendererFor:)
メソッドが呼び出され実際にビューに表示されます。
MKOverlay.boundingMapRectプロパティ
// 2地点間がちょうど表示される縮尺を取得
let rect = route.polyline.boundingMapRect
次に地図の表示位置を調整するために地点間がちょうど表示される縮尺を取得します。縮尺を得るためにpolyline
(経路を示す線)のboundingMapRect
(経路を示す線を端点とした四角形領域)を取得します。階層が少し深くややこしいですがMKOverlay
のプロパティにあります。
クラス階層
class MKRoute : NSObject{
var polyline: MKPolyline
}
class MKPolyline : MKMultiPoint,MKGeoJSONObject,MKOverlay{
}
public protocol MKOverlay : MKAnnotation {
var boundingMapRect: MKMapRect { get }
}
mapView.setRegion(MKCoordinateRegion(rect), animated: true)
MKMapView
クラスは現在地図上に表示しているエリア領域情報をregionプロパティに保持します。今回は表示位置を「boundingMapRect
(経路を示す線を端点とした四角形領域)」にするのでsetRegion
メソッドを呼び出し新しく表示する位置と縮尺にregionプロパティを更新します。そのままではMKMapRect
型なのでMKCoordinateRegion
のイニシャライザを使用しキャスト(型変換)して渡します。animated
にtrue
を渡すことで地図の表示領域の変化が滑らかになります。
最後にビューインスタンスを返すと2地点間の経路が示されたビューが表示されます。
}
return mapView
}
経路の縮尺を調整する
現在のコードだと経路を表示するための地図の縮尺が経路の端から端までが映るギリギリなのでアノテーションが切れてしまったり、余白もないので詰まった印象を感じてしまいます。なので経路カツカツの表示ではなく、以下のように余白がある感じで表示できるようにしていきます。
縮尺を調整するために変更したコード
// 2地点間がちょうど表示される縮尺を取得
let rect = route.polyline.boundingMapRect
// 以下追加&変更
var rectRegion = MKCoordinateRegion(rect)
rectRegion.span.latitudeDelta = rectRegion.span.latitudeDelta * 1.2
rectRegion.span.longitudeDelta = rectRegion.span.longitudeDelta * 1.2
mapView.setRegion(rectRegion, animated: true)
先ほどは縮尺を得るためにpolyline
(経路を示す線)のboundingMapRect
(経路を示す線を端点とした四角形領域)を取得してsetRegion
時にMKCoordinateRegion
型に変換していましたが、縮尺を調整するには先にキャストしておきます。
MKCoordinateRegion構造体
struct MKCoordinateRegion {
var center: CLLocationCoordinate2D // リージョンの中心点
var span: MKCoordinateSpan // 表示するマップ領域を表す水平および垂直の値
}
MKCoordinateRegion
構造体はspan
プロパティに地図として表示する領域の大きさを保持しています。型はMKCoordinateSpan
で、その各プロパティに南北(緯度)と東西(経度)の表示領域の距離を保持しています。設定値はDouble
型のタイプエイリアスです。
MKCoordinateSpan構造体
struct MKCoordinateSpan {
var latitudeDelta: CLLocationDegrees // マップに表示する南北の距離 (度単位)
var longitudeDelta: CLLocationDegrees // マップに表示する東西の距離 (度単位)
}
typealias CLLocationDegrees = Double
なのでまずMKCoordinateRegion
型に変換後、縮尺を「1.2倍」にして再格納し、その後setRegion
を呼び出し実際のビューに反映させています。
rectRegion.span.latitudeDelta = rectRegion.span.latitudeDelta * 1.2
rectRegion.span.longitudeDelta = rectRegion.span.longitudeDelta * 1.2
mapView.setRegion(rectRegion, animated: true)
アノテーションの色や画像を変更する
ちなみにアノテーションの色や画像を変更するにはデリゲートクラスに以下のデリゲートメソッドを追加すればOKです。
class MapManager:NSObject, MKMapViewDelegate{
func mapView(_ mapView: MKMapView, rendererFor overlay: MKOverlay) -> MKOverlayRenderer {
// 省略
}
// アノテーション変更
func mapView(_ mapView: MKMapView, viewFor annotation: MKAnnotation) -> MKAnnotationView? {
let identifier = "annotation"
if let annotationView = mapView.dequeueReusableAnnotationView(withIdentifier: identifier) {
annotationView.annotation = annotation
return annotationView
} else {
let annotationView = MKMarkerAnnotationView(
annotation: annotation,
reuseIdentifier: identifier
)
annotationView.markerTintColor = .blue // UIColorの色に変更
// annotationView.markerTintColor = UIColor(named: "AssetsColorName") // Assetsの色に変更
// annotationView.image = UIImage(systemName: "arrow.backward") // 画像変更
return annotationView
}
}
}
全体のコードと表示
最後に全体のコードを載せておきます。
import MapKit
import SwiftUI
class LocationPin: NSObject, MKAnnotation {
var title: String?
var latitude: Double // 緯度
var longitude: Double // 経度
// 座標
var coordinate:CLLocationCoordinate2D {
CLLocationCoordinate2D(latitude: latitude, longitude: longitude)
}
init(title:String, latitude: Double ,longitude: Double) {
self.title = title
self.latitude = latitude
self.longitude = longitude
}
}
struct UIMapView: UIViewRepresentable {
let Manager = MapManager()
func makeUIView(context: Self.Context) -> UIViewType {
let mapView = Manager.mapViewObj
let basePin1 = LocationPin(title: "東京駅",latitude:35.681464, longitude: 139.767052)
let basePin2 = LocationPin(title: "東京スカイツリー", latitude: 35.709152712026265, longitude: 139.80771829999996)
mapView.addAnnotation(basePin1)
mapView.addAnnotation(basePin2)
let basePlaceMark1 = MKPlacemark(coordinate: basePin1.coordinate)
let basePlaceMark2 = MKPlacemark(coordinate: basePin2.coordinate)
let directionRequest = MKDirections.Request() // リクエストインスタンス
directionRequest.source = MKMapItem(placemark: basePlaceMark1) // 地点1登録
directionRequest.destination = MKMapItem(placemark: basePlaceMark2) // 地点2登録
directionRequest.transportType = MKDirectionsTransportType.automobile // 移動方法登録
let directions = MKDirections(request: directionRequest)
directions.calculate { (response, error) in
// オプショナルバインディングで取り出す
guard let directionResonse = response else {
if let error = error {
print("発生したエラー内容:\(error.localizedDescription)")
}
return // nilなら処理を終了
}
// ルートを取得
let route = directionResonse.routes[0]
// ビューにオーバーレイオブジェクトを追加
mapView.addOverlay(route.polyline, level: .aboveRoads)
// 2地点間がちょうど表示される縮尺を取得
let rect = route.polyline.boundingMapRect
var rectRegion = MKCoordinateRegion(rect)
rectRegion.span.latitudeDelta = rectRegion.span.latitudeDelta * 1.2
rectRegion.span.longitudeDelta = rectRegion.span.longitudeDelta * 1.2
mapView.setRegion(rectRegion, animated: true)
}
return mapView
}
func updateUIView(_ uiView: MKMapView, context: Self.Context) {
uiView.delegate = Manager
}
} // class
class MapManager:NSObject, MKMapViewDelegate{
var mapViewObj = MKMapView()
override init() {
super.init() // スーパクラスのイニシャライザを実行
mapViewObj.delegate = self // 自身をデリゲートプロパティに設定
}
func mapView(_ mapView: MKMapView, rendererFor overlay: MKOverlay) -> MKOverlayRenderer {
let renderer = MKPolylineRenderer(overlay: overlay)
renderer.strokeColor = UIColor.orange
renderer.lineWidth = 3.0
return renderer
}
}
import SwiftUI
import MapKit
struct ContentView: View {
var body: some View {
UIMapView()
}
}
まだまだ勉強中ですので間違っている点や至らぬ点がありましたら教えていただけると助かります。
ご覧いただきありがとうございました。
私がSwift UI学習に使用した参考書