【Kotlin】Android StudioでButtonの使い方!クリックイベント
この記事からわかること
- Android StudioでButtonを実装する方法
- クリックイベントの紐付け方法
- android:onClick属性とは?
- setOnClickListenerメソッドとは?
- 角丸や背景色を変更する
- カラーやサイズの変更
index
[open]
\ アプリをリリースしました /
友達や家族の誕生日をメモ!通知も届く-みんなの誕生日-
posted withアプリーチ
Android Studioでボタンを実装する方法をまとめていきます。
おすすめ記事:【Kotlin】簡単なAndroidアプリの作り方!Android Studioの使い方
環境
- Android Studio:Flamingo
- Kotlin:1.8.20
Android StudioでButtonを実装する方法
Buttonを実装させるにはレイアウトエディターからドラッグ&ドロップするかXMLで直接コードを書き込むかです。どちらの方法でも結果は同じなので慣れた方で実装すればOKです。
レイアウトエディターからドラッグ&ドロップする
「layout」>「activity_main.xml」をクリックして右側の「Code」「Split」「Design」の「Design」を選択します。そこから画像の四角部分にUIが定義されているのでそこからButtonを探し、画面もしくは下の階層プレビューにドラッグ&ドロップします。
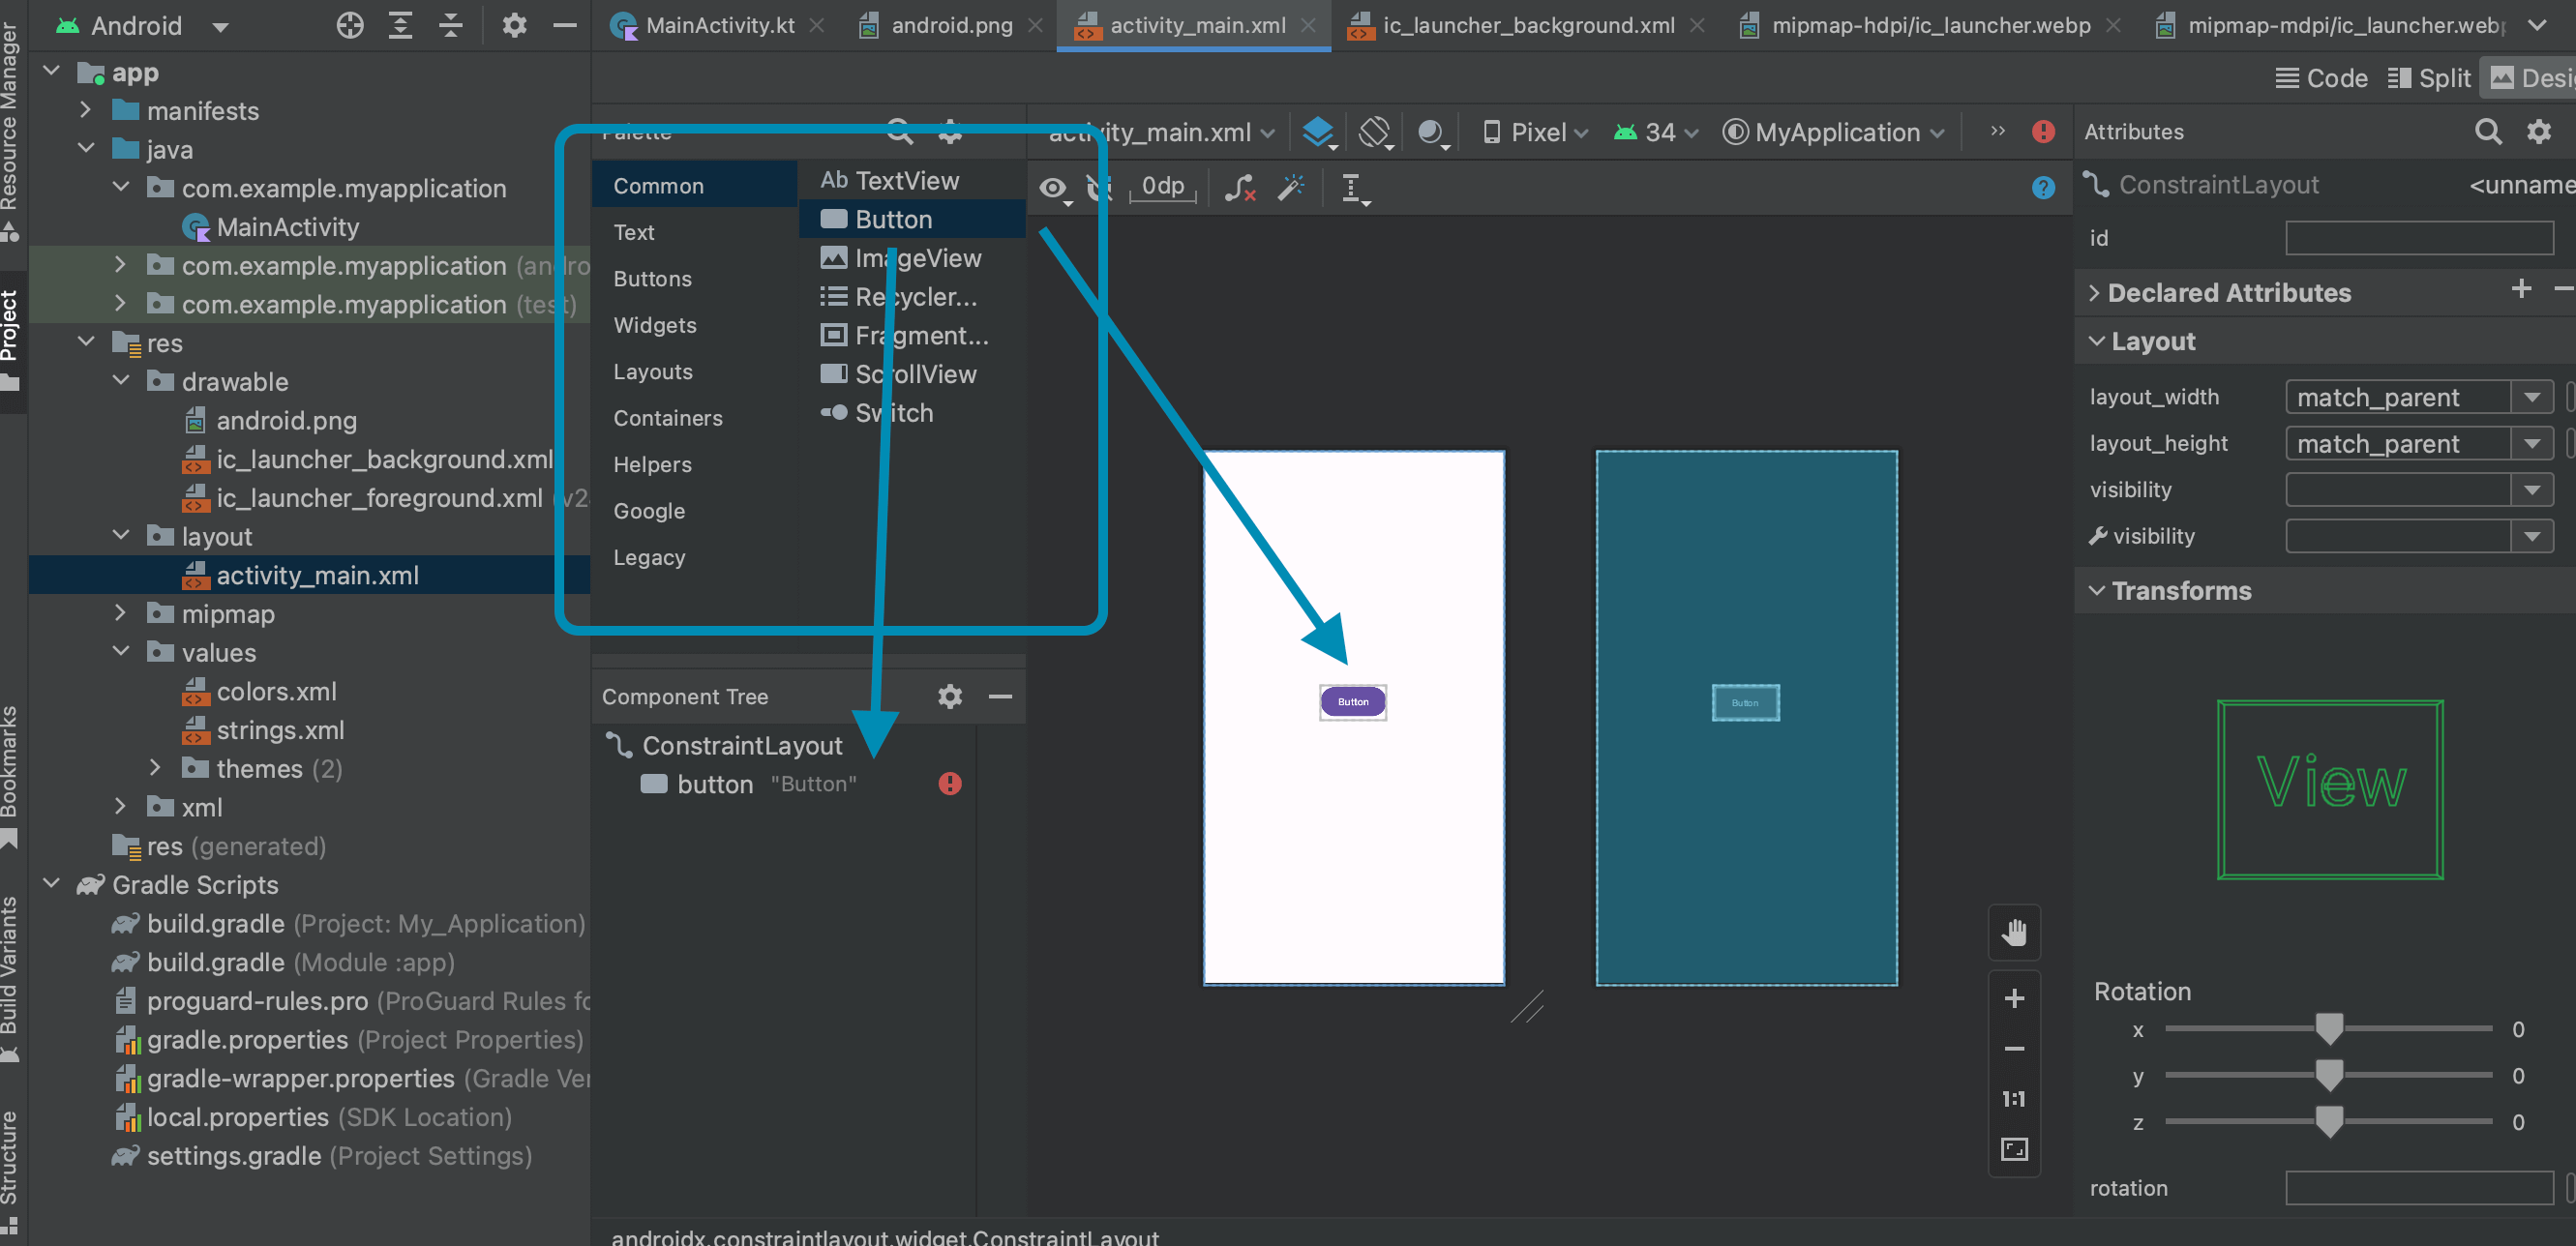
画面の中へドラッグすれば離した位置にボタンを設置することができるので最初はこちらの方がわかりやすいかもしれません。またButtonを配置すると自動でコードも補完されています。
ボタンの文字列やカラーなどの属性はボタンを選択した状態で右側のAttribute
から指定できます。
XMLで直接コードを書き込む
直接コードを書き込む方法では「layout」>「activity_main.xml」をらき、「Code」「Split」「Design」の「Code」を選択します。そして中に<Button.../>
を設置します。
<Button
android:id="@+id/button"
android:layout_width="wrap_content"
android:layout_height="wrap_content"
android:text="Button"
app:layout_constraintBottom_toBottomOf="parent"
app:layout_constraintEnd_toEndOf="parent"
app:layout_constraintStart_toStartOf="parent"
app:layout_constraintTop_toTopOf="parent" />
ボタンの文字列はandroid:text
に指定します。
クリックイベントを実装する
ボタンをタップした時に走らせるクリックイベントを実装する方法は2パターンあります。クリックした時に走らせる処理をclickHandlerFunction
メソッドとして定義したと場合は以下のようになります。
パターン1:android:onClick
<Button
android:id="@+id/done_button"
android:text="@string/done"
...
android:onClick="clickHandlerFunction"/>
パターン2:setOnClickListener
button.setOnClickListener {
clickHandlerFunction(it)
}
どちらも共有で使用するclickHandlerFunction
メソッドは「MainActivity.kt」に定義しておきます。
public fun clickHandlerFunction(viewThatIsClicked: View) {
Log.e("tap","tapされたよ")
}
android:onClick属性
android:onClick
属性はXMLで記述したButtonの定義側からクリックイベントと紐付ける方法です。
<Button
android:id="@+id/button"
android:layout_width="wrap_content"
android:layout_height="wrap_content"
android:text="Button"
app:layout_constraintBottom_toBottomOf="parent"
app:layout_constraintEnd_toEndOf="parent"
app:layout_constraintStart_toStartOf="parent"
app:layout_constraintTop_toTopOf="parent"
android:onClick="clickHandlerFunction"/>
setOnClickListener
setOnClickListener
メソッドは「MainActivity.kt」側で紐づける方法です。findViewById
でボタンを特定しそこからsetOnClickListener
メソッドを呼び出します。
override fun onCreate(savedInstanceState: Bundle?) {
super.onCreate(savedInstanceState)
setContentView(R.layout.activity_main)
val button:Button = findViewById(R.id.button)
button.setOnClickListener {
clickHandlerFunction(it)
}
}
View.OnClickListenerを使用する
View.OnClickListener
を継承したリスナークラスを作成してクリックイベントを実装することも可能です。
val button:Button = findViewById(R.id.button)
val listener = BtnClickSendListener()
button.setOnClickListener(listener)
private inner class BtnClickSendListener : View.OnClickListener {
override fun onClick(v: View?) {
Log.e("tap","tapされたよ")
}
}
ボタンの角丸具合(cornerRadius)を調整する
ボタンの角の丸みを調整するにはapp:cornerRadius
属性に値を指定します。
<Button
android:id="@+id/button"
android:layout_width="wrap_content"
android:layout_height="wrap_content"
android:text="Button"
app:cornerRadius="5"
app:layout_constraintBottom_toBottomOf="parent"
app:layout_constraintEnd_toEndOf="parent"
app:layout_constraintStart_toStartOf="parent"
app:layout_constraintTop_toTopOf="parent" />
ボタンの背景色を変える方法
ボタンの色は何も指定しない場合Android Studioで定義されたデフォルトの色が反映されています。背景色を変更するためにはandroid:backgroundTint
に任意のカラーを渡せばOKです。
android:backgroundTint="@color/black"
カラーは「res」>「values」>「colors.xml」の中に定義を増やして使用します。
<resources>
<color name="black">#FF000000</color>
<color name="white">#FFFFFFFF</color>
</resources>
カスタムボタンの作り方
背景色だけでなく角丸具合や、枠線などを実装したい場合はカスタムshapeを作ると簡単に実装可能です。
まだまだ勉強中ですので間違っている点や至らぬ点がありましたら教えていただけると助かります。
ご覧いただきありがとうございました。